Getting Started Guide
Websense X10G Appliance v7.6.4

Go to the table of contents Go to the previous page Go to the next page Go to the index View or print as PDF
Setting Up Websense X10G Security Blades > Configure the security blade > Web Security Gateway without Network Agent

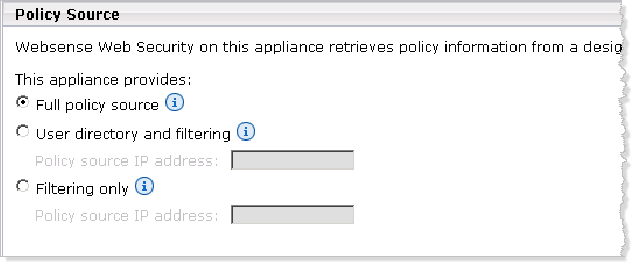
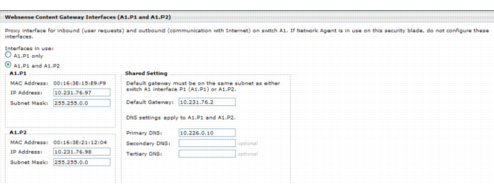
For each blade that does not run Network Agent, after firstboot you will use the Security Blade Manager to configure important settings for network interfaces A1.P1 (and optionally A1.P2), which are used for communication by Websense Content Gateway.
Be sure that interface C can access the NTP server. If interface C does not have Internet access, you can install an NTP server locally on a subnet that can be accessed by interface C.
The gateway must be in the same subnet as the IP address of the interface (A1.P1 or A1.P2) used for communicating with the Internet (outbound traffic).
If you use both A1.P1 and A1.P2 and they are located in different subnets, the default gateway is assigned to the interface that shares the same subnet. If A1.P1 and A1.P2 are within the same subnet, the default gateway is automatically assigned to A1.P2 (which is bound to the virtual eth1 interface). Ensure that outbound packets can reach the Internet.
*
Full policy source (only one blade on a chassis, or one server off-chassis, should be selected to provide full policy)
*
User directory and filtering (you must specify the IP address of a security blade or other machine hosting Policy Database (full policy source)
*
Filtering only (you must specify IP address of a security blade or other machine running Policy Server, which can be a full policy source or user directory and filtering machine)
After collecting the information needed, access Security Blade Manager through a supported browser and follow the steps below to enable default proxy caching and Web filtering. See the Security Blade Manager Help for detailed instructions.
4.
Log on with the user name admin and the password set during firstboot.
5.
In the left navigation pane, click Configuration > System.
6.
Under Time and Date:
*
Automatically synchronize with an NTP server: select this option to use a Network Time Protocol server. Specify up to three NTP servers. Use of an NTP server is recommended, to ensure that database downloads and time-based policies are handled precisely.
*
Manually set time and date: select this option to enter a system time and date yourself.
c.
Click Save in the Time and Date area.
7.
In the left navigation pane, click Configuration > Network Interfaces.
8.
Under Websense Content Gateway Interfaces, configure the A1.P1 and (optional) A1.P2 interfaces. The P interfaces are used to accept users' Internet requests (inbound traffic) and communicate with Web servers (outbound traffic).
a.
Select A1.P1 only or A1.P1 and A1.P2.
If you choose A1.P1 only, enter configuration information (IP address, subnet mask, default gateway, DNS IP addresses) under A1.P1.
If you choose A1.P1 and A1.P2, enter configuration information under both A1.P1 and A1.P2. Note that default gateway and DNS configuration (under Shared Setting) are shared between both A1.P1 and A1.P2.
b.
Click Save in the Websense Content Gateway Interfaces area when you are done.
Important 
If you use the A1.P2 interface, the A1.P1 interface is bound to the virtual eth0 interface, and the A1.P2 interface is bound to the virtual eth1 interface. Keep this in mind when you configure Content Gateway.
For example, suppose you are using a transparent proxy deployment, and the A1.P1 interface is connected to a WCCP router. In this case, you must configure Content Gateway to use the virtual eth0 interface for WCCP communications (in Content Gateway Manager, see the General tab of the Configure > Networking > WCCP page).
Alternatively, you could use both A1.P1 and A1.P2 such that A1.P1 handles inbound traffic and A1.P2 handles outbound traffic. To enable this configuration, be sure to set appropriate routing rules for A1.P1 and A1.P2 on the Configuration > Routing page. For example, you might set outbound traffic to go through A1.P2.
Additionally, you can use A1.P1 as a communication channel for multiple Content Gateway servers in a cluster. In this scenario, A1.P1 should not be used for outbound traffic. For additional information on clusters, see the Content Gateway Manager Help.
a.
In the left navigation pane, click Configuration > Routing.
b.
Under Static Routes, use the Add/Import button to specify customized, static routes.
c.
Under Module Routes, use the Add button to specify non-management Web Security traffic through the C interface.
d.
For either static or module routes, use the Delete button to remove existing routes, if necessary.
Note 
An existing route cannot be edited. If you want to edit a route, delete it and then use the Add/Import (static) or Add (module) button to specify the route with the changes you want.
a.
In the left navigation pane, click Configuration > Web Security Components. Specify the role of this security blade with respect to Websense Web Security policy information. You will have three choices.
Note, Websense blades ship with Full policy source enabled, but only one blade in a chassis (or one server off-chassis) should be the Full policy source. The rest should be used for user directory and filtering, or filtering only.
b.
Choose Full policy source if the blade being configured is the full policy source for the chassis.
c.
Choose User directory and filtering or Filtering only if the security blade currently being configured is not the location of the Policy Database. Enter the IP address of the machine hosting Policy Database (the policy source).
d.
Click Save.
e.
Click Continue on the following dialog box, assuming you are doing an initial setup (no servers were previously set to communicate with this blade for policy information).
f.
Disable the demo copy of TRITON-Web Security on the blade and Save.
12.
Click Log Off, at the top right, when you are ready to log off Security Blade Manager.


Go to the table of contents Go to the previous page Go to the next page Go to the index View or print as PDF
Setting Up Websense X10G Security Blades > Configure the security blade > Web Security Gateway without Network Agent