Go to the table of contents Go to the previous page Go to the next page
Installing components via the Custom option > Installing TRITON Infrastructure
Installing TRITON Infrastructure
Deployment and Installation Center | Web, Data, and Email Security Solutions | Version 7.8.x
TRITON Infrastructure is composed of common user interface components required by the TRITON Unified Security Center modules (the Web Security, Data Security, and Email Security managers).
When installing TRITON Infrastructure, you can choose to also install SQL Server 2008 R2 Express—a free, limited-performance version of SQL Server—to be used for Websense logging data. It is important to note that, as a best practice, SQL Server 2008 R2 Express should be used only in non-production or evaluation environments. A standard or enterprise version of SQL Server should be used in production environments.
1.
*
Selected the Custom installation type, and selected TRITON Infrastructure install. (See Deployment.)
*
*
2.
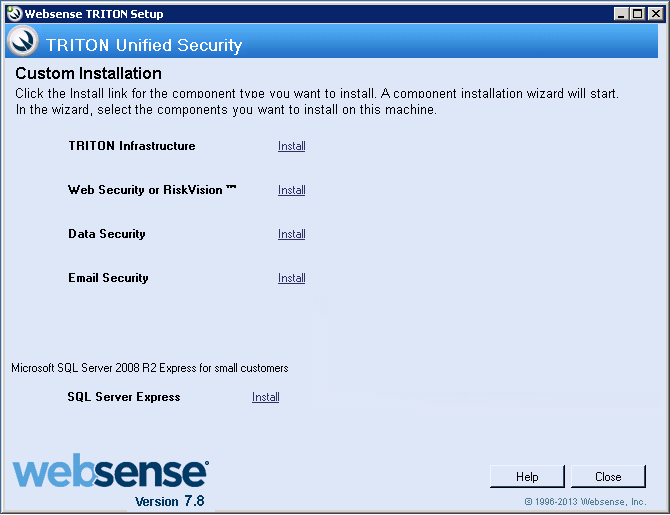
On the Custom Installation dashboard, click the Install link for TRITON Infrastructure. (If TRITON Infrastructure Setup has been started as part of a TRITON Unified Security Center installation, skip this step.)
TRITON Infrastructure Setup is launched.
3.
On the TRITON Infrastructure Setup Welcome screen, click Next.
4.
On the Installation Directory screen, specify the location where you want TRITON Infrastructure to be installed and then click Next.
 
Important 
*
*
5.
On the SQL Server screen, specify the location of your database engine and the type of authentication to use for the connection. Also specify whether to encrypt communication with the database.
The information entered here is also used by the Web, Data, and Email Security component installers, by default. The Web Security component installer can be used to specify a different database; the Data and Email Security component installers cannot.
*
Select Use existing SQL Server on this machine if the Websense installer has already been used to install SQL Server 2008 R2 Express on this machine.
*
Select Install SQL Server Express on this machine to install SQL Server 2008 R2 Express on this machine.
When this option is selected, .NET 3.5 SP1, Powershell 1.0, and Windows Installer 4.5 are installed automatically if they are not found on the machine. These are required for SQL Server 2008 R2 Express.
A default database instance named mssqlserver is created, by default. If a database instance with the default name already exists on this machine, an instance named TRITONSQL2K8R2X is created instead.
If .NET 3.5 SP1 is not found on the machine, the installer needs access to windowsupdate.microsoft.com. If anything blocks this machine from accessing the site, SQL Server Express cannot be installed.
In some cases, you are prompted to reboot the machine after installing SQL Server Express. If you do, to restart the installer:
*
Windows Server 2012: Go to the Start screen and click the Websense TRITON Setup icon.
*
Windows Server 2008 R2: Go to Start > All Programs > Websense > Websense TRITON Setup.
*
Select Use existing SQL Server on another machine to specify the location and connection credentials for a database server located elsewhere in the network.
Enter the Hostname or IP address of the SQL Server machine, including the instance name, if any.
*
*
Also provide the Port used to connect to the database (1433, by default).
Note 
See System requirements for this version to verify your version of SQL Server is supported.
After selecting one of the above options, specify an authentication method and account information:
*
Select the Authentication method to use for database connections: SQL Server Authentication (to use a SQL Server account) or Windows Authentication (to use a Windows trusted connection).
Next, provide the User Name or Account and its Password. If you are using Windows authentication with Data Security, Web Security Gateway Anywhere or Email Security Gateway/Anywhere, use an account with the sysadmin role. If you are using SQL Server Express, sa (the default system administrator account) is automatically specified.
Note 
For more information about permissions required for the connection account, see Installing with SQL Server.
If you use a trusted account, an additional configuration step is required after installation to ensure that reporting data can be displayed in the Web Security manager. See Configuring Websense Apache services to use a trusted connection.
When you click Next, connection to the database engine is verified. If the connection test is successful, the next installer screen appears.
If the test is unsuccessful, the following message appears:
Unable to connect to SQL
Make sure the SQL Server you specified is currently running. If it is running, verify the access credentials you supplied
.
Click OK to dismiss the message, verify the information you entered, and click Next to try again.
6.
On the Server & Credentials screen, select the IP address of this machine and specify network credentials to be used by TRITON Unified Security Center.
*
Select an IP address for this machine. If this machine has a single network interface card (NIC), only one address is listed.
Use the IP address selected to access the TRITON Unified Security Center (via Web browser). Also specify this IP address to any Websense component that needs to connect to the TRITON management server.
If you chose to install SQL Server 2008 R2 Express, if you install Web Security or Email Security Log Server on another machine, specify this IP address for the database engine location.
*
Specify the Server or domain of the user account to be used by TRITON Infrastructure and TRITON Unified Security Center. The server/host name cannot exceed 15 characters.
*
Specify the User name of the account to be used by TRITON Unified Security Center.
*
Enter the Password for the specified account.
7.
On the Administrator Account screen, enter an email address and password for the default TRITON console administration account: admin. When you are finished, click Next.
System notification and password reset information is sent to the email address specified (once SMTP configuration is done; see next step).
It is a best practice to use a strong password as described onscreen.
8.
On the Email Settings screen, enter information about the SMTP server to be used for system notifications and then click Next. You can also configure these settings after installation in the TRITON console.
 
Important 
If you do not configure an SMTP server now and you lose the admin account password (set on previous screen) before the setup is done in the TRITON console, the "Forgot my password" link on the logon page does not provide password recovery information. SMTP server configuration must be completed before password recovery email can be sent.
*
IP address or hostname: IP address or host name of the SMTP server through which email alerts should be sent. In most cases, the default Port (25) should be used. If the specified SMTP server is configured to use a different port, enter it here.
*
Sender email address: Originator email address appearing in notification email.
*
Sender name: Optional descriptive name that can appear in notification email. This name can help recipients identify the notification as email from the TRITON Unified Security Center.
9.
On the Pre-Installation Summary screen, verify the information and then click Next to begin the installation.
 
Warning 
Note 
When you click Next, if you chose to install SQL Server Express on this machine, it may take a couple minutes for the next screen to appear. Wait for the next screen, then see the next step below.
10.
a.
Setup could not restart the machine. Possible causes are insufficient privileges, or an application rejected the restart. Please restart the machine manually and setup will restart.
b.
c.
The Ready to Resume EIP Infra installation screen appears. Click Next.
 
Note 
When you click Next, if you chose to install SQL Server it may take a couple minutes for the next screen to appear. Wait for the next screen, then see the next step below.
11.
The Setup Support Files screen appears and then an Installation Progress screen appears. Wait for these screens to complete automatically. It is not necessary to click or select anything in these screens.
Note that it may take approximately 10-15 minutes for the SQL Server 2008 R2 Express installation to complete.
12.
Next, the Installation screen appears. Wait until all files have been installed.
If the following message appears, check whether port 9443 is already in use on this machine:
Error 1920. Server 'Websense TRITON Central Access' (EIPManagerProxy) failed to start. Verify that you have sufficient privileges to start system services.
If port 9443 is in use, release it and then click Retry to continue installation.
13.
On the Installation Complete screen, click Finish.

Go to the table of contents Go to the previous page Go to the next page
Installing components via the Custom option > Installing TRITON Infrastructure
Copyright 2016 Forcepoint LLC. All rights reserved.