
|

|

|
Upgrading Data Security to v7.6.0 > Upgrading the Data Security Management Server to v7.6.0
|
|
a.
|
Select Start > Programs > Accessories > Scheduled tasks.
|
|
b.
|
|
c.
|
De-select Enabled.
|
|
d.
|
Click OK.
|
|
2.
|
In the Windows Services console, stop the Websense DSS Manager service.
|
|
3.
|
Rename Websense\Data Security\forensics_repository\data
to Websense\Data Security\forensics_repository\oldData |
|
4.
|
Create a new folder named
Websense\Data Security\forensics_repository\data |
|
5.
|
Create a new folder named
Websense\Data Security\archive_mng\oldStorage |
|
6.
|
Move all folders starting with FR-ARC- from Websense\Data Security\archive_mng\storage to Websense\Data Security\archive_mng\oldStorage.
|
|
7.
|
In the Windows Services console, start the Websense DSS Manager service.
|
|
9.
|
|
10.
|
Move or copy all folders starting with FR-ARC- from Websense\Data Security\archive_mng\oldStorage to a location outside the Websense folder.
|
|
1.
|
In the Windows Services console, stop the Websense DSS Manager service.
|
|
2.
|
|
4.
|
In the Windows Services console, start the Websense DSS Manager service.
|
|
5.
|
Move or copy Websense\Data Security Suite\oldArchive to a location outside the Websense folder.
|
|
2.
|
Download WebsenseDataSecurityUpgradeExportTool.zip from www.mywebsense.com.Copy the upgrade_export_tool folder to a temporary folder on the Data Security Management Server (this folder is referred to as the export tool folder in the rest of these instructions).
|
|
Prior to running the export script, see Estimating export data size to estimate the amount of data that will be generated.
|
|
If the script fails during an upgrade from v7.1, do not run it again (running it again may corrupt the data). Contact Websense Technical Support before proceeding.
|
|
|
dbexport.log (in export tool folder you created in Step 2, for example C:\temp\upgrade_export_tool)
|
|
|
db.log (in export tool folder you created in Step 2, for example C:\temp\upgrade_export_tool)
|
|
|
Backup.txt (this file is required when restoring data to the upgraded system)
|
|
|
RunCommands (folder; only present if you had remediation script resources)
|
|
9.
|
TRITON Infrastructure Setup starts. Complete the TRITON Infrastructure Setup wizard. See Installing TRITON Infrastructure for instructions. Return to this procedure when done.
|
|
10.
|
The following message appears. Click OK to proceed (Important: do this only if you have already run the export tool. If you have not, cancel the installation and see Step 1).
|
|
11.
|
Click Next in the prior-version installer to begin removing components.
|
|
12.
|
|
13.
|
You are returned to the Installer Dashboard and the Websense Data Security Installer appears.
|
|
a.
|
Copy the contents of oldData (from the location outside the Websense folder) to Websense\Data Security\forensics_repository\data (note: copy the contents and not the folder itself).
|
|
b.
|
Copy all content moved from Websense\Data Security\archive_mng\oldStorage
(step Windows Step 10) to Websense\Data Security\archive_mng\storage |
|
|
Copy the contents of oldArchive (from the location outside the Websense folder) to Websense\Data Security\forensics_repository (note: copy the contents and not the folder itself).
|
|
i.
|
Select Start > Programs > Accessories > Scheduled tasks.
|
|
ii.
|
|
iii.
|
De-select Enabled.
|
|
iv.
|
Click OK.
|
|
b.
|
In the Windows Services console, stop the Websense DSS Manager service.
|
|
c.
|
Rename Websense\Data Security\forensics_repository\data
to Websense\Data Security\forensics_repository\oldData |
|
d.
|
Create a new folder named
Websense\Data Security\forensics_repository\data |
|
e.
|
Create a new folder named
Websense\Data Security\archive_mng\oldStorage |
|
f.
|
Move all folders starting with FR-ARC-
from Websense\Data Security\archive_mng\storage to Websense\Data Security\archive_mng\oldStorage |
|
g.
|
In the Windows Services console, start the Websense DSS Manager service.
|
|
h.
|
Move or copy the following folder to a location outside the Websense folder:
Websense\Data Security\forensics_repository\oldData |
|
i.
|
|
j.
|
Move or copy all folders starting with FR-ARC-
from Websense\Data Security\archive_mng\oldStorage to a location outside the Websense folder |
|
v.
|
Select Start > Programs > Accessories > Scheduled tasks.
|
|
vi.
|
|
vii.
|
De-select Enabled.
|
|
viii.
|
Click OK.
|
|
l.
|
In the Windows Services console, stop the Websense DSS Manager service.
|
|
m.
|
|
n.
|
Create a new folder named Websense\Data Security Suite\Archive
|
|
p.
|
In the Windows Services console, start the Websense DSS Manager service.
|
|
q.
|
Move or copy Websense\Data Security Suite\oldArchive to a location outside the Websense folder
|
|
7.
|
Copy the upgrade_export_tool folder to a temporary folder on the Data Security Management Server (this folder is referred to as the export tool folder in the rest of these instructions).
|
|
Prior to running the export script, see Estimating export data size to estimate the amount of data that will be generated.
|
|
If the script fails during an upgrade from v7.1, do not run it again (running it again may corrupt the data). Contact Websense Technical Support before proceeding.
|
|
|
dbexport.log (in export tool folder you created in Step 2, for example C:\temp\upgrade_export_tool)
|
|
|
db.log (in export tool folder you created in Step 2, for example C:\temp\upgrade_export_tool)
|
|
|
Backup.txt (this file is required when restoring data to the upgraded system)
|
|
|
RunCommands (folder; only present if you had remediation script resources)
|
|
11.
|
On the target machine (i.e., the one to which you want to upgrade Data Security Management Server), follow the procedures to create a TRITON management server as directed in Creating a TRITON Management Server. Important: when following those procedures, do the following:
|
|
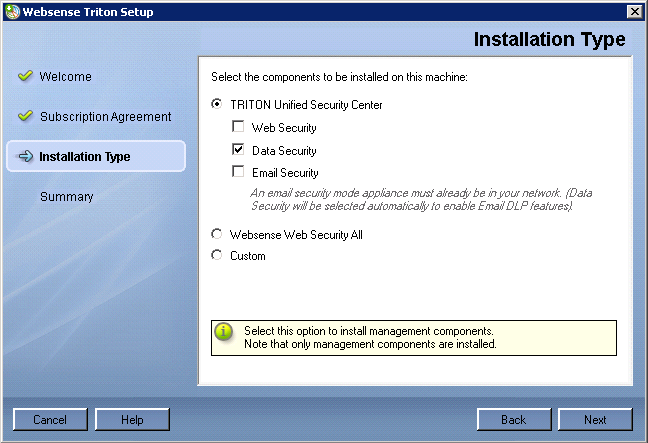
a.
|
When you reach the Installation Type screen of the Websense installer, be sure to select Data Security (under TRITON Unified Security Center). Note that you can install the other modules if you want, but TRITON - Data Security is the only one necessary for a Data Security deployment.
|
|
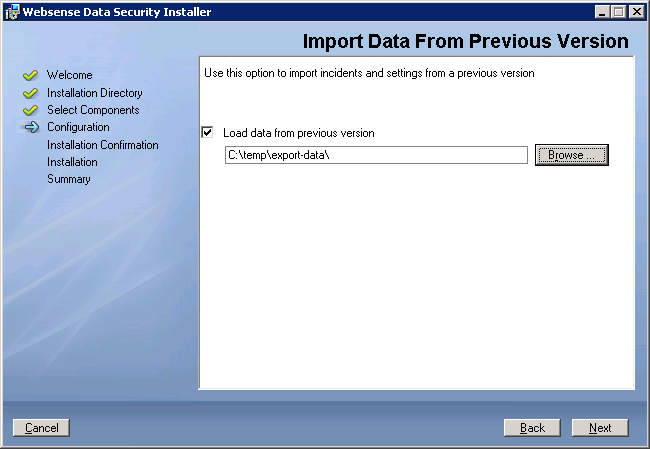
b.
|
When the Data Security installer appears, on the Import Data From Previous Version screen, select the Load Data From Backup check box and then use the Browse button to select the location of the data exported by the export script.
|
|
b.
|
Click Deploy.
|
|
a.
|
Copy the contents of oldData (from the location outside the Websense folder, on the old machine) to Websense\Data Security\forensics_repository\data on this machine (note: copy the contents and not the folder itself).
|
|
b.
|
Copy all content moved from Websense\Data Security\archive_mng\oldStorage on the old machine (Step 10)
|
|
|
Copy the contents of oldArchive (from the location outside the Websense folder, on the old machine) to Websense\Data Security\forensics_repository on this machine (note: copy the contents and not the folder itself).
|
|
|
|
|
Upgrading Data Security to v7.6.0 > Upgrading the Data Security Management Server to v7.6.0
|