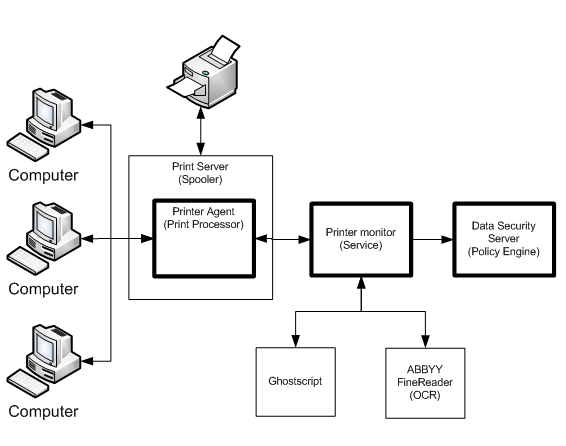
Go to the table of contents Go to the previous page Go to the next page
Printer agent
Deployment and Installation Center | Data Security Solutions | Version 7.7.x
The Data Security printer agent is required when you want to monitor what is printed on your organization's network printers.
The printer agent supports permit and block actions.
When a user on the network prints a file, it is routed to the Microsoft Windows printer spooler service, where the printer agent intercepts it and sends it to the Data Security policy engine. After analysis of the content, the Data Security system enforces the policy as necessary: either auditing, monitoring or blocking the print job from being printed, in which case the sender (the user who printed the document) receives a notification that the print job was blocked.
The printer agent is capable of identifying the user that submitted the print job, because these credentials are included in the print job.
Websense Data Security generates forensics reports that list the blocked print files along with other blocked transmissions.
You install the printer agent on a Windows print server. It includes optical character recognition (OCR) capabilities. The OCR service enables the recognition and prevention of "corporate-defined" confidential content being printed. The OCR service is required not only to support certain sources, but is also a must when certain printer drivers are used, for example, PCL 6. As a general rule, only standard formats, such as extended meta file (EMF), printer control language (PCL), text (TXT), and postscript (PS) can be received by the printer agent. Nonstandard formats are not supported.
The printer agent is installed using a separate printer agent package (WebsenseDataSecurityPrinterAgent.zip) See Installing the printer agent for instructions.
Operating system support
The printer agent supports the following Windows Server 2003 32-bit environments:
*
*
*
Required ports
The following ports must be kept open for the printer agent:
 
Prerequisites
There are 2 prerequisites for installing the Data Security printer agent:
*
*
*
If these 2 conditions are not met, the installer doesn't show the option to install the printer agent.
Installing the printer agent
1.
Download and extract WebsenseDataSecurityPrinterAgent.zip from mywebsense.com on the print server machine.
2.
Launch the Data Security installer, DSS-7.7.0.60-x86.msi, on the print spooler machine. Your version and build number may vary.
3.
On the Welcome screen, click Next to begin the installation.
4.
In the Destination Folder screen, specify the folder into which to install the agent.
The default destination is C:\Program Files or Program Files (x86)\Websense\Data Security. If you have a larger drive, it is used instead. Large removable drives may be detected by the system as a local drive and used as the default. Do not install on removable media.
 
Important 
Note 
5.
On the Select Components screen, select Printer Agent and then Entire feature will be installed on local hard drive.
6.
When prompted, click Setup to extract a software installer for GPL Ghostscript. Ghostscript is an interpreter for .ps and .pdf description languages. This software is required for the printer agent.
7.
8.
The Optical Character Recognition screen appears.
 
Per printed page:
This parameter limits dynamically (according to the number of pages) the total time that the OCR can extract text from the printed job. In case of a timeout, the content analysis will be performed only on the extracted text that took place before the timeout.
No more than nn seconds:
This number is a static overall limit to the total time that the OCR can extract text from the printed job. In case of a timeout, the content analysis will be performed only on the extracted text that took place before the timeout.
Optionally, you can change the default values defined for the OCR Analysis Threshold and the OCR Accuracy.
9.
The Fingerprinting Database screen appears. To choose a location other than the default shown, use the Browse button.
10.
In the Server Access screen, select the IP address to identify this machine to other Websense components.
11.
In the Register with the Data Security Server screen specify the path and log on credentials for the Data Security server to which this agent will connect. This could be the TRITON management server or a secondary Data Security server.
FQDN is the fully-qualified domain name of a machine.
12.
In the Local Administrator screen, enter a user name and password as instructed on-screen. The server/host name portion of the user name cannot exceed 15 characters. If you are installing Data Security v7.7.0, this password cannot exceed 19 characters. If you are installing version 7.7.2 or beyond, password length doesn't matter.
13.
n the Installation Confirmation screen, if all the information entered is correct, click the Install button to begin installation.
Installation may seem to take a long time. Unless a specific error or failure message appears, allow the installer to proceed.
If the following message appears, click Yes to continue the installation:
Data Security needs port 80 free.
In order to proceed with this installation, DSS will free up this port.
Click Yes to proceed OR click No to preserve your settings.
Clicking No cancels the installation.
A similar message for port 443 may appear. Click Yes to continue or No to cancel the installation.
14.
A Configure Printer Agent screen appears.
a.
A red exclamation point indicates that a printer has settings that are incompatible with the printer agent. The printer agent is unable to monitor traffic for printers that are configured with incompatible settings, for example, "Print directly to printer." Hover the mouse over a problematic printer for details in a tooltip.
You can still select an incompatible printer. If you do, the following message appears:
The Websense Printer Agent is unable to monitor traffic when one or more printers are configured with incompatible settings. Do you wish Websense to correct the settings?
b.
Click Yes. The settings are automatically modified to accommodate the printer agent.
15.
The Print Processor Destination(s) screen appears.
This screen is for information only; there are no options to select. The displayed list contains the names of all cluster nodes on which the printer agent is installed. Make sure that all nodes holding print spooler resources are listed.
16.
Once installation is complete, the Installation Complete screen appears to inform you that your installation is complete. Click Finish.
The printers you selected appear as policy resources in TRITON - Data Security. To view them, log onto the TRITON Console and navigate to Main > Configuration > Resources.
17.
To complete the process, click Deploy in TRITON - Data Security.
Detecting the printer driver
If you are having difficulty with the recognition and configuring of your printers with the printer agent, you can export the printer registration file to send to Websense Technical Support for analysis. This file indicates printer names and drivers.
To export printer registration files:
1.
Click Start > Run and in the Run dialog, type regedit.
2.
Click OK in the Run dialog. The Registry Editor screen is displayed.
3.
4.
5.
6.
Click Save.
7.
Alternative detection of printer driver
Alternatively, users may access the following registry key on the print server to detect the printer driver:
HKEY_LOCAL_MACHINE\SYSTEM\CurrentControlSet\Control\Print\Printers\ {Printer Name}\
In the registry key, open the printer driver entry and view the string value.
To access the above registry key, refer to Detecting the printer driver, steps 1 to 3 above.
Configuration settings for non-English text
If your printers are used for non-English text, you need to make minor modifications to the following configuration files:
*
*
To modify the configuration files:
1.
C:\Program Files\Websense\Data Security\ABBYY\Profiles
2.
Locate the following 2 files: ExportToTXT-Accurate.ini and ExportToTXT-Fast.ini.
3.
Open each of the above .ini files in a text-editing application.
4.
5.
[RecognizerParams]
TextLanguage = English,French
6.
Printer agent performance
The printer agent has different demand levels, depending on whether it is in Monitoring or Blocking mode, and whether the OCR service is activated or deactivated.
Monitoring mode operates in an asynchronous manner and therefore, does not introduce analysis time overhead to the printing time.
In Blocking mode, the OCR processing adds up to 3 seconds per page depending on the CPU power of the printer server. You can select Blocking or Monitoring in the Edit Printer Agent window, accessed through Settings > Deployment > System Modules. Select the printer agent on the System Modules screen.
Select Monitoring if you want to monitor traffic through the print server but not block it.
Select Blocking if you want to block actions that breach policy.

Go to the table of contents Go to the previous page Go to the next page
Copyright 2016 Forcepoint LLC. All rights reserved.