Deployment and Installation Center
Websense TRITON Enterprise v7.6.x

Go to the table of contents Go to the previous page Go to the next page Go to the index
Integrating Data Security with Existing Infrastructure > Working with existing email infrastructure

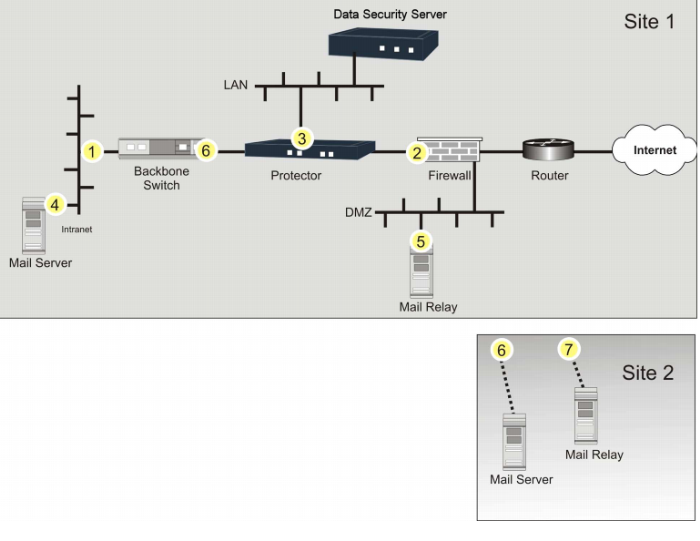
You can configure Websense Data Security within your existing email infrastructure to block and quarantine email that contravenes your policies.
You can do this by connecting Websense Email Security Gateway, the SMTP agent, or the Websense protector to the network directly in the path of the traffic, enabling traffic to be not only monitored, but also blocked, quarantined, or even terminated before it reaches its destination.
If you want the option to block email that breaches policy, the SMTP agent is the easiest deployment option to configure, monitor, and debug in a production email environment. Do the following to set up the SMTP agent within your email infrastructure for this purpose:
1.
Run the Websense installer as described in Installing Data Security Components. You can install the SMTP agent on a TRITON Management Server, supplemental Data Security server, or as a stand-alone agent on another Windows server machine equipped with Microsoft IIS.
2.
To configure the SMTP agent, in TRITON - Data Security, select Settings > Deployment > System Modules. Select the SMTP agent.
*
In the General tab:
*
Set the Mode to Blocking.
*
In the SMTP Filter tab:
*
Select the Enable filtering on the following internal email domains check box.
*
In the Encryption & Bypass tab:
*
If you want encrypted or flagged email to bypass analysis, select the Enable redirection gateway check box, then enter the redirection gateway IP and port. Specify the encryption and/or bypass flags to use.
*
In the Advanced tab:
*
Click OK to save all the above settings.
4.
Select Main > Policy Management > DLP Policies. Select the policy rule that you wish to use for email management and click Edit.
*
Select Destinations, and check the Network Email box.
*
Select Severity & Action, then select an action plan that includes notifications.
6.
Click Deploy to activate the settings.
In monitoring mode, the protector monitors and analyzes SMTP traffic, but does not enable policies to block transactions. It is important that not all networks have permission to send email via the protector's SMTP service, otherwise the protector can be used as a mail relay. To avoid this, you should limit the networks that send email via the protector.
In explicit MTA mode, the protector acts as an MTA for your SMTP traffic and operates in protect mode. Protect mode allows you to block transactions that breach policy.
The figure below shows a common topology in which the protector is installed inline. The checklist in this section refers to the numbers in this figure.
*
2.
Run the Websense installer as described in Installing Data Security Components. During installation make sure the time, date and timezone are precise, and map eth0 to verify it is located on the main board.
4.
To configure the protector, in TRITON - Data Security, select Settings > Deployment > System Modules. Select the protector.
*
In the General tab:
*
Select Enabled.
*
In the Networking tab:
*
Set Default gateway to the outbound gateway.
*
Set Interface to br0.
*
For the Connection mode, select Inline (Bridge).
*
In the Network Interfaces list, select br0 and click Edit. Select Enable bypass mode to allow traffic in case of Data Security Server software/hardware failure. Click OK.
*
In the Local Networks tab:
*
Select Include specific networks. Add all the internal networks for all sites. This list is used to identify the direction of the traffic.The mail servers and mail relays should be considered part of the internal network.
*
In the Services tab
*
Select the SMTP service. On the General tab, set the Mode to Monitoring bridge. On the Traffic Filter tab, set the Direction to Outbound. Click OK.
*
Select the HTTP service. On the General tab, set the Mode to Monitoring bridge. On the Traffic Filter tab, set the Direction to Outbound. On the HTTP Filter tab, select Exclude destination domains if required. Click OK.
*
Click OK to save all the above settings, and click Deploy to activate the settings.
6.
Connect the protector to the outgoing connection and to the organization's internal network. This should be done last, after the protector is fully configured.
2.
Run the Websense installer as described in Installing Data Security Components. Make sure the time, date and time zone are precise, and verify that eth0 (or whatever port you specified during installation) is mapped and located on the main board.
1.
In TRITON - Data Security, select Settings > Deployment > System Modules. Select the protector.
2.
In the General tab:
*
Select Enabled.
3.
In the Local Networks tab:
*
Select Include specific networks. Add all the internal networks for all sites. This list is used to identify the direction of the traffic.The mail servers and mail relays should be considered part of the internal network.
4.
In the Services tab:
*
Select the SMTP service.
*
On the General tab, set the Mode to Mail Transfer Agent (MTA).
*
On the Mail Transfer Agent (MTA) tab:
*
Set the Operation Mode to Blocking and select the behavior desired when an unspecified error occurs during analysis.
*
Set the SMTP HELO name. This is required.
*
Set the next hop MTA if required (for example, the company mail relay).
*
Set the addresses of all networks that are permitted to relay email messages through the protector. This is required, as it is important that not all networks have permission to send email via the protector's SMTP service, otherwise the protector can be used as a mail relay. This list should include the addresses any previous hops, such as your mail server.
5.
Click OK to save all the above settings for the protector.
6.
Select Main > Policy Management > DLP Policies. Select the policy rule that you wish to use for email management and click Edit.
*
Select Destinations, and check the Network Email box.
*
Select Severity & Action, then select an action plan that includes notifications.
Note 
For more information about action plans, see the section "Action Plans" in TRITON - Data Security Help.
*
Click OK to save all the above settings.
8.
Click Deploy to activate the settings.
1.
Connect the protector to the outgoing connection and to the organization's internal network. This should be done last, after the protector is fully configured.
2.


Go to the table of contents Go to the previous page Go to the next page Go to the index
Integrating Data Security with Existing Infrastructure > Working with existing email infrastructure