Deployment and Installation Center
Websense TRITON Enterprise v7.6.x

Go to the table of contents Go to the previous page Go to the next page Go to the index
Upgrading to Data Security 7.6.0 > Upgrading Data Security Management Server

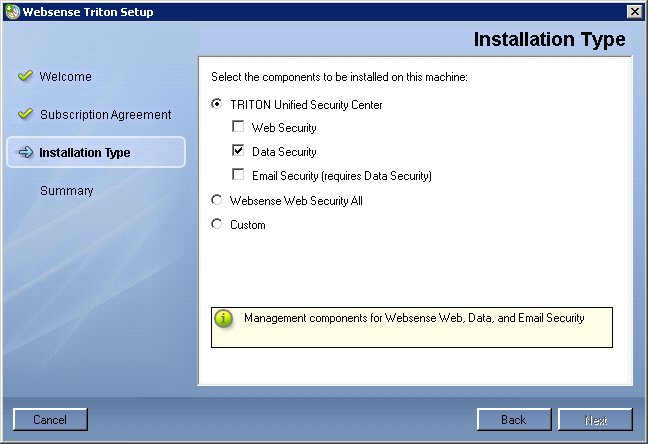
Complete these instructions to upgrade a Data Security Management Server from version 7.1 or 7.5 to 7.6.0. Unless otherwise noted, all instructions apply to both version 7.1 and 7.5 Data Security Management Server.
You can either upgrade Data Security Management Server "in place," i.e., it is upgraded to version 7.6 on its current machine, or you can upgrade it to another machine (for example, from a Windows Server 2003 machine to a Window Server 2008 R2 machine). There is a procedure below for each case:
In version 7.6, Data Security Management Server is part of the TRITON management server. These instructions will refer to TRITON management server in place of Data Security Management Server when discussing version 7.6. Additionally, Data Security 7.6 uses Microsoft SQL Server instead of Oracle Database for data storage.
Note that the upgrade process can take a long time because large amounts of data may need to be copied. You can reduce this time by relocating the forensics repository (steps for doing this are included in the procedure below). See Forensics Repository for more information.
2.
Check the System Health screen to make sure your system is functioning properly. If you suspect it is not, please contact Websense Technical Support before proceeding.
In DSS Manager, select Configuration > System Modules and then click the PDF icon.
Note 
If your forensics repository is large (more than approximately 3 GB) upgrading Data Security can take a very long time. It is strongly recommended you relocate forensics data prior to using the upgrade export tool and then copy the data back to the appropriate location after upgrading. It is a best practice to relocate forensics a day prior to upgrading Data Security to allow sufficient time to complete this task.
Warning 
If you have archived partitions, you must relocate forensics prior to using the upgrade export tool. Otherwise, the archived partitions will not be available in the upgraded system.
i.
Select Start > Programs > Accessories > Scheduled tasks.
ii.
Right-click DSS Watchdog and select Properties.
iii.
De-select Enabled.
iv.
b.
In the Windows Services console, stop the Websense DSS Manager service.
Alternatively, issue the command net stop tomcat6 in a Command Prompt.
c.
Rename Websense\Data Security\forensics_repository\data
to Websense\Data Security\forensics_repository\oldData
d.
Create a new folder named
Websense\Data Security\forensics_repository\data
e.
Create a new folder named
Websense\Data Security\archive_mng\oldStorage
f.
Move all folders starting with FR-ARC-
from Websense\Data Security\archive_mng\storage
to Websense\Data Security\archive_mng\oldStorage
g.
In the Windows Services console, start the Websense DSS Manager service.
Alternatively, issue the command net start tomcat6 in a Command Prompt.
h.
Move or copy the following folder to a location outside the Websense folder:
Websense\Data Security\forensics_repository\oldData
i.
Search the oldData folder for files with the name *.ser and delete those files.
j.
Move or copy all folders starting with FR-ARC-
from Websense\Data Security\archive_mng\oldStorage
to a location outside the Websense folder
k.
In the Windows Services console, stop the Websense DSS Manager service.
Alternatively, issue the command net stop tomcat6 in a Command Prompt.
l.
Rename Websense\Data Security Suite\Archive
to Websense\Data Security Suite\oldArchive
m.
Create a new folder named Websense\Data Security Suite\Archive.
n.
Share the Archive folder, and give the 'change' and 'write' permissions to both the DSS user and the currently logged-in user (the user that will run the script).
o.
In the Windows Services console, start the Websense DSS Manager service.
Alternatively, issue the command net start tomcat6 in a Command Prompt.
p.
Move or copy Websense\Data Security Suite\oldArchive to a location outside the Websense folder
Download WebsenseDataSecurityUpgradeExportTool.zip from www.mywebsense.com.
7.
Copy the upgrade_export_tool folder to a temporary folder on the Data Security Management Server (this folder is referred to as the export tool folder in the rest of these instructions).
Copy to a location outside the Websense folder (typically, C:\Program Files\Websense) for example C:\temp\upgrade_export_tool.
Important 
Data Security 7.5 will continue to operate, but new data generated after running the export tool will not be imported to Data Security 7.6.
Note 
Prior to running the export script, see Estimating export data size to estimate the amount of data that will be generated.
Note the above command generates export data in %dss_home%/archive_mng/export-data. You can specify a different location by specifying a path in the command:
where <path> is local; it cannot be a network path or a location on a mapped network drive. If you specify <path>, substitute it for %dss_home%/archive/mng/export-data in the remaining steps below.
Important 
If the script fails during an upgrade from v7.1, do not run it again (running it again may corrupt the data). Contact Websense Technical Support before proceeding.
*
dbexport.log (in export tool folder you created in Step 7, for example C:\temp\upgrade_export_tool)
*
db.log (in export tool folder you created in Step 7, for example C:\temp\upgrade_export_tool)
10.
If you provided an alternate path in step 7b, skip to step 10. Otherwise, move the data exported by the export script to a location outside the Websense folder.
The exported data is located in %dss_home%/archive_mng/export-data. Move the entire export-data folder to a location outside the Websense folder (typically, C:\Program Files\Websense).
Note the export-data folder should contain the following. If it does not and you're upgrading from v7.5, try running the script again. If it does not and you're upgrading from v7.1, contact Websense Technical Support.
*
Backup.txt (this file is required when restoring data to the upgraded system)
*
The Installer Dashboard appears.
TRITON Infrastructure is required for TRITON Unified Security Center. In version 7.6, all management interfaces (i.e., TRITON - Web Security, - Data Security, and - Email Security) are modules of the TRITON Unified Security Center. TRITON Unified Security Center will be installed on this machine and v7.5 TRITON - Data Security upgraded to be its Data Security module.
15.
The following message appears. Click OK to proceed (Important: do this only if you have already run the export tool. If you have not, cancel the installation and see Step 6).
Before installing this version of Data Security, the existing version will be removed. Please make sure that the export-tool of this version has been successfully executed on this machine. Click OK to remove the existing version of Data Security, or Cancel to exit.
The prior-version Data Security components are first removed and then replaced with current versions. The prior-version Data Security Installation Wizard is launched. This is used to remove components.
Note that the Installer Dashboard remains on-screen, behind the prior-version installer.
16.
Click Next in the prior-version installer to begin removing components.
17.
When the wizard notifies you that Data Security has been successfully installed, click Finish
Note the screen mentions installation success, but this simply means the Data Security Installation Wizard has completed its task successfully, which in this case is removing components.
18.
You are returned to the Installer Dashboard and the Websense Data Security Installer appears.
19.
Install version 7.6 Data Security components. Be sure to select the same components for installation as were previously on this machine. You can install additional components as well.
See Installing Data Security Components for instructions. Important: When following these instructions, be sure to import the data exported when you ran the export script (in Step 6) on the Import Data From Previous Version screen.
a.
Copy the contents of oldData (from the location outside the Websense folder) to Websense\Data Security\forensics_repository\data (note: copy the contents and not the folder itself).
b.
Copy all content moved from Websense\Data Security\archive_mng\oldStorage
(step Windows Step j)
to Websense\Data Security\archive_mng\storage
*
Copy the contents of oldArchive (from the location outside the Websense folder) to Websense\Data Security\forensics_repository (note: copy the contents and not the folder itself).
21.
Oracle is no longer used by Data Security in version 7.6. To conserve system resources, it is a best practice to disable the Oracle service.
To disable Oracle, in the Windows Services console, disable the OracleServiceMng service. Note that this disables the service but does not remove any old data. Disabling Oracle is optional.
The following process is different from a fresh install; it describes how to migrate incidents, reports, and more from your existing system to the new one.
1.
Make sure your current Data Security (Suite) deployment has hotfixes applied for its version as follows:
2.
Check the System Health screen to make sure your system is functioning properly. If you suspect it is not, please contact Websense Technical Support before proceeding.
In DSS Manager, select Configuration > System Modules and then click the PDF icon.
Note 
If your forensics repository is large (more than approximately 3 GB) upgrading Data Security can take a very long time. It is strongly recommended you relocate forensics data prior to using the upgrade export tool and then copy the data back to the appropriate location after upgrading. It is a best practice to relocate forensics a day prior to upgrading Data Security to allow sufficient time to complete this task.
Warning 
If you have archived partitions, you must relocate forensics prior to using the upgrade export tool. Otherwise, the archived partitions will not be available in the upgraded system.
v.
Select Start > Programs > Accessories > Scheduled tasks.
vi.
Right-click DSS Watchdog and select Properties.
vii.
De-select Enabled.
viii.
b.
In the Windows Services console, stop the Websense DSS Manager service.
Alternatively, issue the command net stop tomcat6 in a Command Prompt.
c.
Rename Websense\Data Security\forensics_repository\data
to Websense\Data Security\forensics_repository\oldData
d.
Create a new folder named
Websense\Data Security\forensics_repository\data
e.
Create a new folder named
Websense\Data Security\archive_mng\oldStorage
f.
Move all folders starting with FR-ARC-
from Websense\Data Security\archive_mng\storage
to Websense\Data Security\archive_mng\oldStorage
g.
In the Windows Services console, start the Websense DSS Manager service.
Alternatively, issue the command net start tomcat6 in a Command Prompt.
h.
Move or copy the following folder to a location outside the Websense folder:
Websense\Data Security\forensics_repository\oldData
i.
Search the oldData folder for files with the name *.ser and delete those files.
j.
Move or copy all folders starting with FR-ARC-
from Websense\Data Security\archive_mng\oldStorage
to a location outside the Websense folder
ix.
Select Start > Programs > Accessories > Scheduled tasks.
x.
Right-click DSS Watchdog and select Properties.
xi.
De-select Enabled.
xii.
l.
In the Windows Services console, stop the Websense DSS Manager service.
Alternatively, issue the command net stop tomcat6 in a Command Prompt.
m.
Rename Websense\Data Security Suite\Archive
to Websense\Data Security Suite\oldArchive
n.
Create a new folder named Websense\Data Security Suite\Archive
o.
Share the Archive folder, and give the 'change' and 'write' permissions to both the DSS user and the currently logged-in user (the user that will run the script).
p.
In the Windows Services console, start the Websense DSS Manager service.
Alternatively, issue the command net start tomcat6 in a Command Prompt.
q.
Move or copy Websense\Data Security Suite\oldArchive to a location outside the Websense folder
Download WebsenseDataSecurityUpgradeExportTool.zip from www.mywebsense.com.
7.
Copy the upgrade_export_tool folder to a temporary folder on the Data Security Management Server (this folder is referred to as the export tool folder in the rest of these instructions).
Copy to a location outside the Websense folder (typically, C:\Program Files\Websense) for example C:\temp\upgrade_export_tool.
Important 
Data Security 7.5 will continue to operate, but new data generated after running the export tool will not be imported to Data Security 7.6.
Note 
Prior to running the export script, see Estimating export data size to estimate the amount of data that will be generated.
Note the above command generates export data in %dss_home%/archive_mng/export-data. You can specify a different location by specifying a path in the command:
where <path> is local; it cannot be a network path or a location on a mapped network drive. If you specify <path>, substitute it for %dss_home%/archive/mng/export-data in the remaining steps below.
Important 
If the script fails during an upgrade from v7.1, do not run it again (running it again may corrupt the data). Contact Websense Technical Support before proceeding.
*
dbexport.log (in export tool folder you created in Step 7, for example C:\temp\upgrade_export_tool)
*
db.log (in export tool folder you created in Step 7, for example C:\temp\upgrade_export_tool)
10.
If you provided an alternate path in step 8b, skip to step 10. Otherwise, move the data exported by the export script to the target machine (i.e., the one to which you want to upgrade Data Security Management Server).
*
Backup.txt (this file is required when restoring data to the upgraded system)
*
11.
On the target machine (i.e., the one to which you want to upgrade Data Security Management Server), follow the procedures to create a TRITON management server as directed in Creating a TRITON Management Server. Important: when following those procedures, do the following:
a.
When you reach the Installation Type screen of the Websense installer, be sure to select Data Security (under TRITON Unified Security Center). Note that you can install the other modules if you want, but TRITON - Data Security is the only one necessary for a Data Security deployment.
b.
When the Data Security installer appears, on the Import Data From Previous Version screen, select the Load Data From Backup check box and then use the Browse button to select the location of the data exported by the export script.
b.
Click Deploy.
Note that at this point the system is functional. However, if you relocated forensics data prior to upgrade, it is not present yet. You will restore this data in the next step.
a.
Copy the contents of oldData (from the location outside the Websense folder, on the old machine) to Websense\Data Security\forensics_repository\data on this machine (note: copy the contents and not the folder itself).
b.
Copy all content moved from Websense\Data Security\archive_mng\oldStorage on the old machine
(step Windows Step j)
to Websense\Data Security\archive_mng\storage on this machine
*
Copy the contents of oldArchive (from the location outside the Websense folder, on the old machine) to Websense\Data Security\forensics_repository on this machine (note: copy the contents and not the folder itself).


Go to the table of contents Go to the previous page Go to the next page Go to the index
Upgrading to Data Security 7.6.0 > Upgrading Data Security Management Server