Go to the table of contents Go to the previous page Go to the next page View or print as PDF
Installing Forcepoint Email Security in Microsoft Azure > Post-Deployment Steps: All Versions > Configure the appliance in the Forcepoint Security Manager
Configure the appliance in the Forcepoint Security Manager
Forcepoint Email Security steps
Some initial configuration settings are important for Forcepoint Email Security operation. Perform the following activities after you install the Forcepoint Email Security management components.
1.
The Email module displays.
2.
The Configuration Wizard displays for first-time setup.
If you skip this step, you can enter your subscription key later on the page Settings > General > Subscription.
3.
See Using the first-time Configuration Wizard.
4.
During installation in Azure, only one of your email VAs is registered to DLP; following installation, it is necessary to register the rest of your appliances.
5.
Navigate to General > Data Loss Prevention and verify which appliance is already registered. Next, register each additional appliance.
The DLP Module can be registered at any point, but it is recommended to do this before any other configuration is completed. See Registering the DLP Module.
6.
An appliance cluster is necessary when using load balancers, which are deployed by default for a deployment of Forcepoint Email Security in Azure with two or more VAs.
Clustered appliances must all share the same platform; i.e., your Azure appliances cannot be clustered together with on-premises virtual appliances or physical appliances.
Appliance clusters are not available for Forcepoint DLP Email Gateway.
a.
Navigate to Settings > General > Cluster Mode.
b.
Select the appliance mode Cluster (Primary).
A Cluster Properties box opens with the primary appliance IP address displayed in the field Cluster communication IP address. Secondary appliances use this IP address for cluster communication.
c.
Click Add.
The page Add Secondary Appliance displays, where you can designate the secondary appliances in this cluster.
(Optional) Add a new appliance that is not already in this list; click Add New Appliance.
The Add Appliance page displays.
d.
e.
The appliance is added to the Secondary Appliances list along with its status.
f.
The appliance is added to the cluster.
See Configuring an appliance cluster.
7.
a.
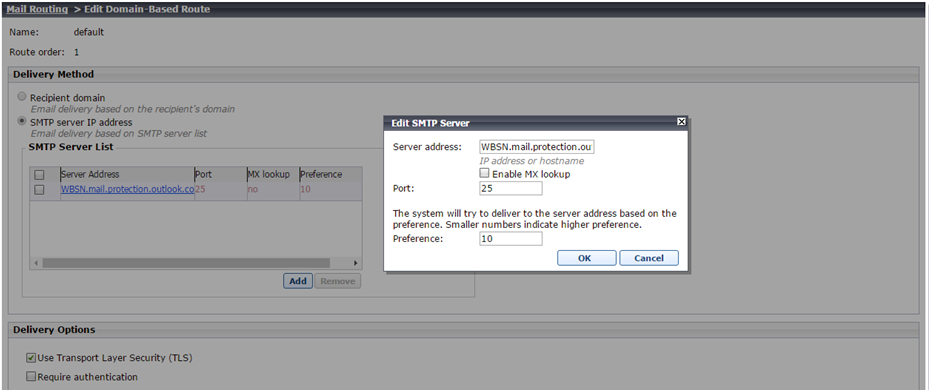
Navigate to Settings > Inbound/Outbound > Mail Routing.
b.
c.
From Delivery Method, select SMTP server IP address.
d.
e.
*
*
*
f.
g.
h.
Click OK.
i.
Under Delivery Options, select Use Transport Layer Security (TLS).
j.
Click OK.
k.
8.
9.
10.
Click Help on any Forcepoint Security Manager page for help about the page. See Forcepoint DLP Email Gateway Help for complete information about the DLP Module.
Forcepoint DLP steps
These steps are necessary if you have existing DLP policies, or if Forcepoint Security Manager is deployed on-premises.
1.
2.
3.
Click Deploy. No other configuration steps are required.
A Forcepoint DLP Email Gateway module is shown on the System Modules page, as well as System Health and System Logs.
Use the System Modules page to edit the display name or description for the appliance. If desired, you can balance the load on the gateway by selecting System Modules > Load Balancing and then editing the Forcepoint DLP Email Gateway module.
Refer to Forcepoint DLP Administrator Help for more information.

Go to the table of contents Go to the previous page Go to the next page View or print as PDF
Installing Forcepoint Email Security in Microsoft Azure > Post-Deployment Steps: All Versions > Configure the appliance in the Forcepoint Security Manager
Copyright 2022 Forcepoint. All rights reserved.