
|

|

|

|
Creating Custom Block Pages : Get started with block page elements
|
|
Do not edit the default block page files directly. Instead, follow the instructions in Edit block page files (overview) to make a copy of the files as a template for your custom block pages.
|
|
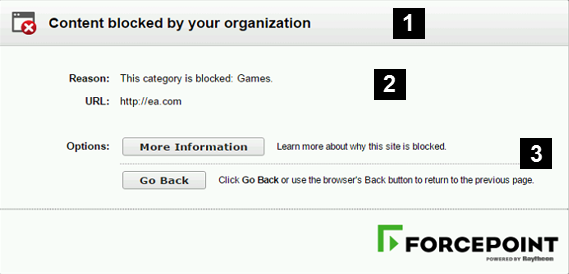
1.
|
The header explains that the site is blocked.
|
|
2.
|
The top frame contains a block message showing the requested URL and the reason the URL was blocked.
|
|
3.
|
The bottom frame presents any options available to the user, such as the option to go back to the previous page, or to click a Continue or Use Quota Time button to view the site.
|
|
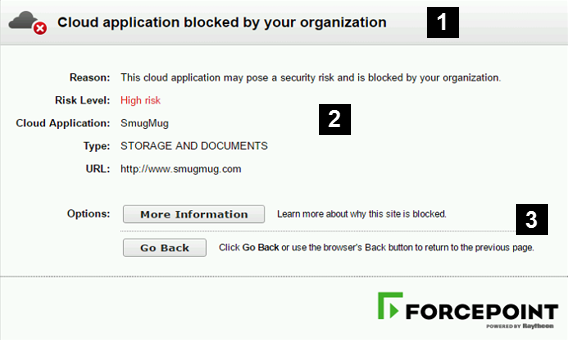
1.
|
The header explains that the application is blocked.
|
|
2.
|
The top frame contains a block message showing the requested application and the reason the application was blocked.
|
|
3.
|
The bottom frame presents any options available to the user, such as the option to go back to the previous page, or to click a Continue or Use Quota Time button to view the site.
|

|
|
|
|
master.html constructs the header and top frame for the block page, and uses one of the following files to display appropriate options in the bottom frame
|
|
Text and buttons for sites in categories to which the Confirm action is applied.
|
|
|
Text and buttons for sites in categories to which the Quota action is applied.
|
|
|
Content for the page that appears when a user clicks the More information link on the block page.
|
|
|
Content for the page that appears when a user clicks the More Information link on the cloud application block page.
|
|
|
block.html contains the text for the top frame of the block message, which explains that access is restricted, lists the requested site, and describes why the site is restricted.
|
|
|
|
|
|
Creating Custom Block Pages : Get started with block page elements
|