
Support

|

|

|

|
v7.7 Release Notes for Websense® Web Security : New in Websense Web Security v7.7
|
|
Websense Web Filter, Web Security, Web Security Gateway, and Web Security Gateway Anywhere, v7.7
|
The Status > Today and History pages have been merged and enhanced into a multi-tab Status > Dashboard page.
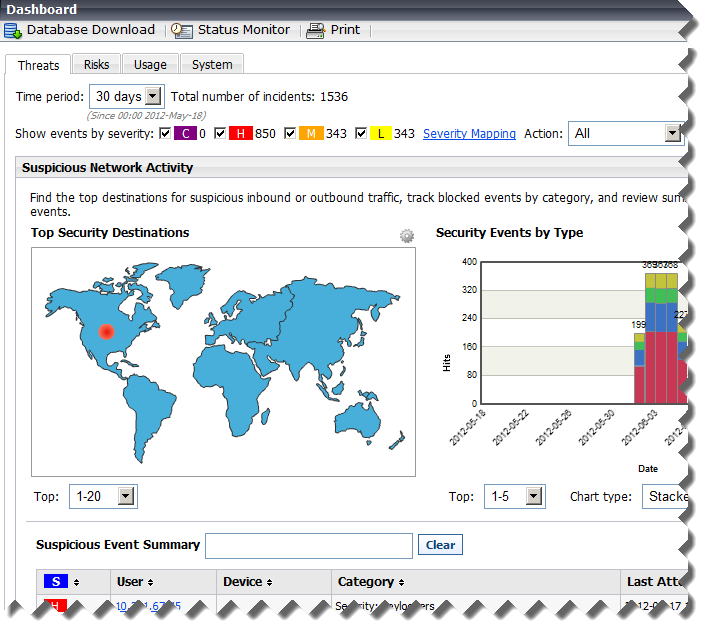
When you log on to TRITON - Web Security, the Threats dashboard is displayed, showing information about suspicious activity in your network (see Tools to fight advanced persistent threats).
|
|
Risks shows information about blocked and permitted requests for URLs that fall into the Security Risk class. The amount of information depends on your subscription level. Web Security, Web Security Gateway, or Web Security Gateway Anywhere is required to see information about requests in some security-specific categories.
|
|
|
Usage shows information about traffic patterns in your network, including bandwidth information and filtering summaries.
|
|
|
System shows alert messages, status information, and graphical charts that show the current state of your Web Security solution, focusing on component health and Internet activity in your network.
|
Elements on the Risks, Usage, and System dashboards can be configured to show data for various time periods (from one day to 30 days, by default). Most charts can be edited to display in bar, line, or pie chart format.
In addition, you now have the option to show multiple versions of the same dashboard element, either on the same tab, or on different tabs. You might display one Top Uncategorized Sites chart with today's values, next to a Top Uncategorized Sites chart for the last 2 weeks.
Changes to dashboard charts and overall dashboard layout are saved separately for each administrator account.
Use the Threats tab of the Web Security Dashboard to monitor and investigate suspicious activity in your network that could indicate advanced malware attacks.
|
|
Web Security Gateway or Web Security Gateway Anywhere is required to display information about outbound threats and to provide detailed forensic data about the threats.
|
|
|
Top Security Destinations shows the top 10 countries that are targets (destinations) for suspicious network traffic.
|
|
|
Security Events by Type shows the number of blocked requests for sites (destinations) in security categories associated with malware threats.
|
|
|
Suspicious Event Summary lists information about the severity, source IP address, user, host name (if available; requires Websense Content Gateway), category, time, direction, and destination of blocked and permitted requests associated with malware threats.
|
Controls at the top of the tab let you restrict the information displayed to specific severity types (Critical, High, Medium, or Low), directions (inbound or outbound), and time periods (today, 2 days, 7 days, and so on).
You can also click a geographical area or a category in the charts at the top of the page to further refine the information that appears in the summary table.
Click a user name, IP address, or host name in the summary table to see a detail page with information about all incidents associated with the selected client, including the forensics data (if any) collected. The detail page also includes a link to ACEInsight that administrators can use to perform further research on the threats associated with the incident.
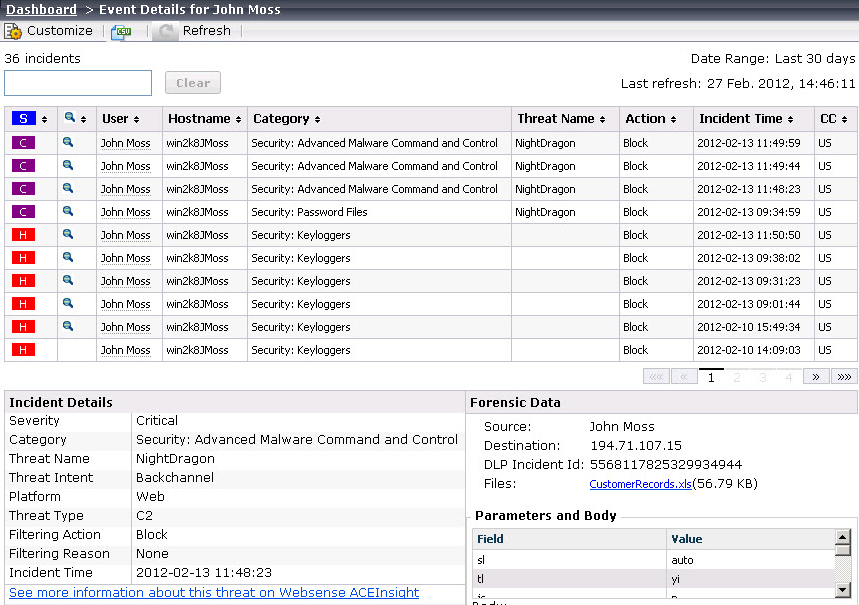
Unconditional Super Administrators can grant access to the Threats dashboard while blocking access to forensics data associated with threat incidents. Because advanced malware attacks try to steal key data from individuals and organizations, forensics data may include files that contain sensitive information.
Websense software can notify you via email or SNMP when suspicious activity of a specified severity level (critical, high, medium, or low) reaches a defined threshold. Suspicious activity may be a sign of an advanced malware attack in your network.
|
|
Each alert message includes a link to the Dashboard > Threats > Event Details page that you can use to investigate the associated incidents.
|
Use the Settings > Alerts > Suspicious Activity page to enable, disable, or change alerting configuration for alerts associated with suspicious events in your network.
Flood control settings configured for category and protocol usage alerts are also applied to suspicious activity alerts.
Exceptions give administrators a way to quickly permit URLs and IP addresses in blocked categories, or block URLs and IP addresses in permitted categories.
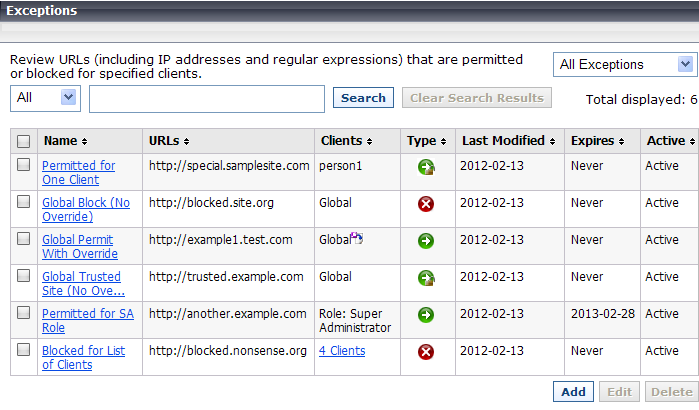
Creating an exception does not require changing the category of a URL, nor does it change the policy assigned to affected clients. It simply allows a flexible and rapid response to user requests, changes in company policies, spikes in Internet activity, or other changes in circumstance.
Permitted exceptions replace unfiltered URLs as a method for permitting one or more clients to access URLs or IP addresses in blocked categories.
Super Administrators see all exceptions, regardless of the role in which they were created. Delegated administrators see all exceptions that affect their current role.
Only Super Administrators can create global exceptions. When a global exception is created, the Super Administrator can specify whether the global exception takes precedence over all delegated administrator exceptions (the default), or whether delegated administrator exceptions can be used to override the global exception.
|
|
The option to create your own reports from scratch. In addition to working from existing (custom or predefined) reports, you can select one of 2 base templates to create a trend or top N report.
|
|
Base Templates > New Trend Report
|
Provide a name and title for the report, assign it to a report category, then define the basic elements of the report, including:
Click Save and Edit to further refine the report using the same report filters used for any predefined or custom report.
|
||||
|
Base Template > New Top N Report
|
Provide a name and title for the report, assign it to a report category, then define the basic elements of the report, including:
Click Save and Edit to further refine the report using the same report filters used for any predefined or custom report.
|
|
Trends > Social Networking Trends by Requests
|
Shows requests for URLs in Social Networking categories over a selected period of time. Summary information showing request totals for each data point in the period are provided below the chart.
|
|
Trends > Security Risk Trends by Requests
|
Shows requests for URLs in Security Risk categories over a selected period of time. Summary information showing requests totals for each data point in the period are provided below the chart.
|
|
|
A new User-Defined category in the Report Catalog for storing custom reports.
|
|
|
Combined request, browse time, and bandwidth information (when available) in many existing reports. Previously, all 3 measures could not be shown together.
|
In previous versions, investigative reports could include Internet browse time information only in summary reports. In version 7.7, you have the option to enable browse time calculation for investigative detail reports on the Settings > Reporting > Log Database page in TRITON - Web Security.
Although Browse Time always appears as an available column when you are creating or modifying v7.7 investigative detail reports, you must enable the detailed browse time calculation for data to be available.
|
|
Saving browse time detail information increases the size of the Log Database. Monitor Log Database Growth Rates and Sizing data on the Log Database page after enabling this feature in case the size difference warrants changes to your rollover settings.
|
|
|
Browse time information for detail reports is only available for dates subsequent to when the feature was enabled.
|
In previous versions, when file type blocking was applied to a category, the blocking was performed based purely on file extension.
Now, when Websense Web Security Gateway and Gateway Anywhere customers enable file type blocking, when a user requests a site, Websense software:
|
3.
|
If the file is not blocked by extension, Content Gateway or the hybrid service analyzes the file to determine its true file type.
|
|
File Type
|
Associated Extensions
|
|
.ace, .arc, .arj, .b64, .bhx, .cab, .gz, .gzip, .hqx, .iso, .jar, .lzh, .mim, .rar, tar, taz, .tgz, .tz, .uu, .uue, .xxe, .z, .zip
|
|
|
.ade, .adp, .asd, .cwk, .doc, .docx, .dot, .dotm, .dotx, .grv, .iaf, .lit, .lwp, .maf, .mam, .maq, .mar, .mat, .mda, .mdb, .mde, .mdt, .mdw, .mpd, .mpp, .mpt, .msg, .oab, .obi, .oft, .olm, .one, .ops, .ost, .pa, .pdf, .pip, .pot, .potm, .potx, .ppa, .ppam, .pps, .ppsm, .ppsx, .ppt, .pptm, .pptx, .prf, .pst, .pub, .puz, .sldm, .sldx, .snp, .svd, .thmx, .vdx, .vsd, .vss, .vst, .vsx, .vtx, .wbk, .wks, .wll, .wri, .xar, .xl, .xla, .xlb, .xlc, .xll, .xlm, .xls, .xlsb, .xlsm, .xlsx, .xlt, .xltm, .xltx, .xlw, .xsf, .xsn
|
|
|
.bmp, .cmu, .djvu, .emf, .fbm, .fits, .gif, .icb, .ico, .jpeg, .jpg, .mgr, .miff, .pbf, .pbm, .pcx, .pdd, .pds, .pix, .png, .psb, .psd, .psp, .rle, .sgi, .sir, .targa, .tga, .tif, .tiff, .tpic, .vda, .vst, .zif
|
|
|
.aif, .aifc, .aiff, .asf, .asx, .avi, .ivf, .m1v, .m3u, .mid, .midi, .mov, .mp2, .mp2v, .mp3, .mpa, .mpe, .mpg, .mpv2, .ogg, .qt, .ra, .ram, .rmi, .snd, .wav, .wax, .wm, .wma, .wmp, .wmv, .wmx, .wxv
|
|
When a user clicks More Information on a block page, a secondary block page displays:
|
|
The Real-time category, if any, assigned to the URL. This is the category returned by Content Gateway analysis of the site.
|
|
|
The Static category assigned to the URL in the Websense Master Database.
|
|
|
Which Web Security component provided the category that led the site to be blocked (Category set by).
|
As in previous versions, administrators can right-click the top frame of More Information page for details about how the request was filtered.
In Websense Web Security Gateway Anywhere deployments, there is now an option to enhance the security block page with a link to ACEInsight. This free service from Websense Security Labs can be used to review detailed information about a URL.
To enable the ACEInsight link on the security block page, navigate to the Settings > General > Filtering page in TRITON - Web Security.
When an HTTPS site is sent to ACEInsight for analysis, the block page passes only the domain portion of the URL. This prevents potentially sensitive information in the query string from being sent over the Internet. As a result, ACEInsight is not able to provide the same deep analysis of the page as Content Gateway performed, and may therefore return a different categorization than was used to block the request.
The features and functions of the Web Security Log Server Configuration Utility have been integrated into the TRITON console. Instead of launching a separate tool to manage Log Server connection details, navigate to the Settings > Reporting > Log Server page in TRITON - Web Security.
|
|
Configure the method used to add log records to the database (ODBC or BCP), as well as where cache or BCP files are stored.
|
|
The enhanced logging feature, used to control how Log Server resumes logging after it has been stopped, can now be configured only via the logserver.ini file.
By default, this option is disabled, and Log Server begins processing at the beginning of the oldest log cache file after a stop. This can result in some duplicate entries in the Log Database, but speeds Log Server processing.
|
WebCatcher configuration is now performed on the Settings > General > Accounts page. In addition, WebCatcher now uses the proxy server settings configured on the Settings > General > Database Download page when sending data.
The Settings > Reporting > Log Database page in TRITON - Web Security has been enhanced to improve the ease of Log Database configuration, as well as to support new features.
|
|
A new Growth Rates and Sizing chart plots the size of each Log Database logging partition.
|
|
|
Internet Browse Time options now include the option to calculate detailed browse time information for use in investigative detail reports.
|
|
|
To support trend reporting in the Web Security Dashboard and presentation reports, Trend Data Retention options let you choose whether to calculate and store trend data. You can also specify how long to store daily, weekly, monthly, and yearly trend data.
|
During TRITON Unified Security Center installation, you can now select a non-standard Microsoft SQL Server port. If you enter a non-standard port in the TRITON Infrastructure installer, that port information is passed to the Web Security installer.
Previous versions required that you use default port 1433 during installation, with the option to change the port once installation was complete.
You can still change the SQL Server connection port after installation, if needed, on the Settings > Reporting > Log Server page in TRITON - Web Security. (The separate Log Server Configuration Utility is no longer needed.)
If your Microsoft SQL Server installation is configured to use SSL encryption, you can configure Websense components to encrypt their connection to the Log Database via the:
|
|
TRITON Unified Installer (select Encrypt connection)
|
|
|
Web Security module installer (select Use SSL to connect to the Log Database)
|
|
|
Settings > Reporting > Log Server page in TRITON - Web Security (select Use SSL to connect to the Log Database)
|
|
Configure encryption in Microsoft SQL Server before enabling this feature in either the installer or the TRITON console. See the Deployment and Installation Center for more information.
|
This allows organizations with special security requirements to encrypt the data that Log Server sends to the Log Database.
|
|
If you are running TRITON - Web Security on a Websense appliance, the connection from the console to the database cannot be encrypted. This means that if the Microsoft SQL Server Force Protocol Encryption option is set to Yes, no data appears in the Web Security Dashboard or other reporting tools.
|
DC Agent uses a file called dc_config.txt to record the domains and domain controllers it finds. When one or more DC Agent instances are installed in your network, you can now review the complete list of domains and domain controllers polled by all DC Agent instances in your network from within TRITON - Web Security. Just navigate to the Settings > General > User Identification page and click View Domain List.
In addition, you can now configure DC Agent domain discovery settings on the User Identification > DC Agent page.
|
|
Enable or disable automatic domain discovery (the process by which DC Agent automatically identifies the domains and domain controllers it can query).
|
As in previous versions, these settings can also be configured manually in the transid.ini file for each DC Agent instance.
A series of new health alerts notify administrators when Filtering Service cannot communicate with a Websense transparent identification agent:
When a network issue or other communication problem prevents Filtering Service from communicating with a transparent identification agent, the Filtering Service user map may not be updated in a timely manner, and user-based policies may not be applied correctly.
Other new health alerts give administrators early notification of potential Log Database and Log Server issues:
Normally, Log Server cache files are moved to the Log Database at a steady rate. If cache files are accumulating, there may be a network issue, a change to the account that Log Server uses to connect to the Log Database, disk space problems on the Log Database machine, or other issues.
Filtering Service is responsible for providing log data to Log Server. If Filtering Service cannot communicate with Log Server, that log data is lost.
The ETL (Extract, Transform, and Load) job is responsible for processing data into the partition database. It requires sufficient disk space, disk speed, and other system resources to run efficiently.
While it is possible to include multiple Log Server instances in a deployment, there can be only one Log Server instance associated with each Policy Server. Attempting to connect multiple Log Server instances to the same Policy Server can interfere with reporting.
Enable time-based (stateful) filtering in deployments with multiple Filtering Service instances
If your deployment includes multiple instances of Filtering Service that might handle a request from the same user, an optional component, Websense State Server, can be installed to enable proper application of time-based filtering actions (Quota, Confirm, Password Override, and Account Override).
When State Server is installed, it allows its associated Filtering Service instances to share timing information, so users receive the correct allotment of quota, confirm, or override session time.
State Server is typically installed on a Policy Server machine, and only one State Server instance is required per logical deployment. A logical deployment is any group of Policy Server and Filtering Service instances that might handle requests from the same set of users.
|
|
All Filtering Service instances that communicate with the same State Server instance must share the same time zone, and the time on all machines must be in sync.
|
|
|
All Filtering Service instances associated with the same Policy Server must communicate with the same State Server.
|
|
|
On Websense appliances, use the Administration > Toolbox > Command Line Utility to enable state-service.
|
Educational institutions with a software deployment of Websense Web Security or Web Filter can use a Filtering Service configuration parameter to enable YouTube for Schools. This YouTube service provides access to educational videos from inside the school network, even when other YouTube content is blocked.
|
In Web Security Gateway and Gateway Anywhere software or appliance deployments, you can enable YouTube for Schools via Content Gateway, rather than via Filtering Service.
|
Once you have enrolled in the program and received a school account code or ID, the general steps are:
|
1.
|
In TRITON - Web Security, navigate to the Settings > General > Filtering page, and verify that Enable search filtering is selected at the bottom of the page.
|
|
2.
|
Make sure that the YouTube is permitted for the clients that will be granted YouTube in Schools access.
|
|
3.
|
Edit the eimserver.ini file for each Filtering Service instance in your network to include the following lines:
|
[SafeSearchCustomValues]
YouTubeEDUFilter=<school_account_code>
YouTubeEDUFilter=<school_account_code>
In this version, Network Agent can capture and filter traffic encapsulated with 802.1Q VLAN protocols.
|
|
The monitor NIC (the network card used to monitor Internet activity) connects to the switch port with a 802.1Q protocol header.
|
|
|
The blocking NIC (used to send block pages or block messages) does not need to include the 802.1Q protocol header. As a result, it cannot be connected directly to access ports.
|
If your organization uses a supported Security Information and Event Management (SIEM) solution, you can configure Websense software to forward log data from Filtering Service to the SIEM product.
Before you enable SIEM integration, you must install or enable a new component, Websense Multiplexer, for each Policy Server in your deployment.
|
|
In software deployments, use the Custom installation option to install Websense Multiplexer on each Policy Server machine.
|
|
|
On Websense appliances, use the Administration > Toolbox > Command Line Utility to enable mux-service on the full policy source and each user directory and filtering machine.
|
Enable SIEM integration on the Settings > General > SIEM Integration page in TRITON - Web Security, then select the syntax to use in formatting the data (syslog/CEF [Arcsight], syslog/LEEF [QRadar], syslog/key-value pairs [Splunk and others], or custom). If you select custom, you are prompted to provide a format string.
Once SIEM integration is enabled, Multiplexer begins passing data from Filtering Service to both Log Server and the SIEM product.
The ability to block and permit IPv6 traffic using Network Agent, introduced in v7.6, has been extended to allow full filtering of IPv6 addresses in software and appliance deployments. This includes both URL filtering (IPv6 addresses categorized in the Master Database or defined in an exception) and filtering of IPv6 clients (computers and networks).
|
|
Network Agent (standalone mode) or Content Gateway (Websense Web Security Gateway or Gateway Anywhere) is required to enable IPv6 filtering.
|
|
|
Source and destination IPv6 addresses are not recorded in the Log Database, with one exception. If no user name information is available for an IPv6 client, the IPv6 address is recorded in the user name field. As a result, dashboard charts, investigative reports, and presentation reports include only limited IPv6 address information.
|
|
|
DC Agent, eDirectory Agent, and RADIUS Agent do not support IPv6 addresses. (Logon Agent, however, does support IPv6.)
|
When a field in TRITON - Web Security requires a specific IP address format, the format is noted (for example, "IPv4 address"). Otherwise, either format can be used.
The machines hosting Websense Web Security components, and any network infrastructure (like DNS servers and domain controllers) that Websense components use, must have an IPv4 address.
Websense Web Security Gateway and Gateway Anywhere Global Security Administrators and unconditional Super Administrators can now enable single-sign-on access for Super Administrators connecting to Content Gateway Manager from within TRITON - Web Security.
When single-sign-on access is enabled, Super Administrators with Content Gateway single sign on permissions can navigate to the Settings > General > Content Gateway Access page in TRITON - Web Security and click Log On next to the IP address or hostname of a Content Gateway instance.
Content Gateway single sign on permissions are granted when the administrator is added to the Super Administrators role, and can be removed by any unconditional Super Administrator.
The administrator is taken directly to Content Gateway Manager without seeing a logon page or having to enter credentials.
Enhanced Directory Agent configuration and performance
The Settings > Hybrid Configuration > Shared User Data page in TRITON - Web Security has been enhanced to make it easier for Websense Web Security Gateway Anywhere administrators to configure Directory Agent to include and exclude specific directory service contexts.
|
In version 7.7, Websense Directory Agent is installed but not enabled on Websense appliances.
To enable Directory Agent, go to the Administration > Toolbox > Command Line Utility in Appliance Manager and enable directory-agent-service.
|
Instead of typing in directory context information, the directory tree is displayed. Navigate to the context that you want to include or exclude from Directory Agent searches, or use search to display matching contexts in the tree.
|
|
Limit which directory contexts are synchronized with the hybrid service to save time and enhance performance.
|
|
|
Exclude contexts that might lead to synchronization problems (for example, contexts containing groups with duplicate email entries).
|
In addition, a limitation that prevented Directory Agent from processing more than 1500 attribute values for an LDAP record has been removed. Directory Agent can now process LDAP records with any number of attribute values.
The Status > Hybrid Service page now includes a link to the User Agent Volume report. The report output consists of a table, showing:
A user agent is the string sent from the browser or application to identify itself, its version number, and system details like operating system.
If a user agent in the report has a high number of authentication requests, it may be experiencing authentication problems. You can create a new custom authentication rule to allow the agent to either bypass authentication or use a different type of authentication. Select one or more user agents in the report, then click Create Rule.
Custom authentication rules are configured on the new Settings > Hybrid Configuration > Custom Authentication page. Here, you can identify applications that do not properly handle authentication challenges by specifying user agents, domains, or URLs, or a combination of these options.
Websense Web Security Gateway Anywhere administrators now have the option to configure failover to the hybrid service for filtered locations that use explicit proxies. This ensures that users are able to access the Internet and are always filtered in the event that your on-premises proxies are unavailable.
Failover to the hybrid service for a filtered location must be approved, to ensure that Websense services can provision the correct number of users at the data center nearest to your location. Once failover for a filtered location has been approved, it does not need to be re-approved if you change the failover details or later disable and then re-enable failover.
|
|
The Settings > Hybrid Configuration > Filtered Locations page has been enhanced to more clearly distinguish between locations filtered by on-premises components and locations filtered by the hybrid service.
|
|
|
The Settings > Hybrid Configuration > Hybrid User Identification page now includes the option to create or change the Web Endpoint anti-tampering password. There is still an option to create the password in the Unified Endpoint Package Builder when a Web Endpoint installation package is being configured.
|
|
|
The Settings > Hybrid Configuration > Hybrid User Identification page now includes an additional method for user identification and authentication. In addition to NTLM and basic authentication, secure form authentication can be used.
|
|
|
For sites that want to use the default PAC file, but have port 8082 or 8081 locked down, the Proxy Auto-Configuration File section of the Settings > Hybrid Configuration > User Access page now offers 2 options:
|
|
|
The hybrid service now supports SSL decryption bypass settings for IP address and range for both clients and destinations as defined on the Settings > Scanning > SSL Decryption Bypass page in TRITON - Web Security. There are 3 exceptions:
|
|
|
Bypass specifications for IPv6 addresses and ranges are not supported. Sync Service does not pass these addresses and ranges to the hybrid service.
|
|
|
Bypass specifications for client machine private IP addresses are not supported. Sync Service does send these IP addresses, but they are disregarded by the hybrid service.
|
|
|
Bypass specifications for client machine hostnames are not supported. Sync Service does not pass these hostnames to the hybrid service.
|
|
|
The Session Timeout period configured on the Settings > Hybrid Configuration > User Identification page in TRITON - Web Security determines how long user credentials are assumed valid by Websense Authentication Service and secure form authentication.
|
Organizations that require a longer timeout period can now request the option to extend the timeout period beyond its current maximum (30 days). When enabled, this allows the timeout period to be extended to 3, 6, or 12 months.
 Quick Links
 Service Requests
How are we doing?
Provide us feedback on your experience with the Service Request portal.
provide feedback >|
|
|
|
|
v7.7 Release Notes for Websense® Web Security : New in Websense Web Security v7.7
|