
|

|

|
Integrating Web Security with Check Point > Configuring CheckPoint secure communication
|
|
|
|
|
|
|
|
|
|
Do not perform the procedures in this section if you are using an earlier version of FireWall-1 (before FireWall-1 NG Feature Pack 1).
|
|
1.
|
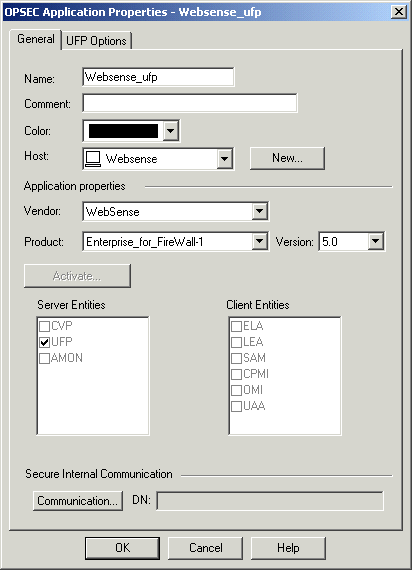
Open the SmartDashboard, and select Manage > Servers and OPSEC Applications.
|
|
2.
|
|
a.
|
Go to the UFP Options tab of the OPSEC Application Properties dialog box for this object.
|
|
b.
|
Make sure the Use early versions compatibility mode check box is not selected. (This field was called Use backwards compatibility mode in earlier versions.)
|
|
4.
|
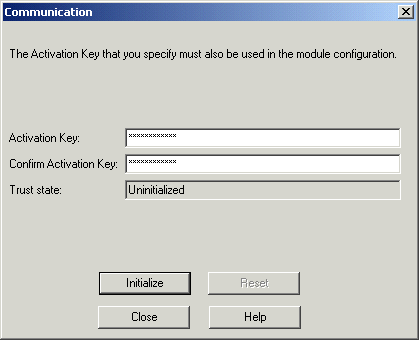
Click Communication.
|
|
5.
|
Enter and confirm an Activation Key (password) for communication between Websense Filtering Service and the Check Point product. (Make a note of this password for later use.)
|
|
6.
|
Click Initialize.
|
|
7.
|
|
8.
|
Close the Servers and OPSEC Applications dialog box.
|
|
9.
|
Select Policy > Install to install the policy on the firewall. See the Check Point product documentation for more information.
|
|
Path to the output certificate file, opsec.p12. This variable must be expressed as a complete path.
|
|
3.
|
Write down the SIC name displayed by the opsec_pull_cert command.
|
|
4.
|
Open the ufp.conf file, located by default in the C:\Program Files or Program Files (x86)\Websense\Web Security\bin or /opt/Websense/bin directory.
|
|
5.
|
To enable secure communication, comment out the first line and remove the comment symbol (#) from the remaining four lines.
|
|
|
Windows: Use the Windows Services dialog box.
|
|
|
Linux: Use the ./WebsenseAdmin restart command.
|
|
1.
|
Open the SmartDashboard and select Manage > Servers and OPSEC Applications.
|
|
2.
|
|
3.
|
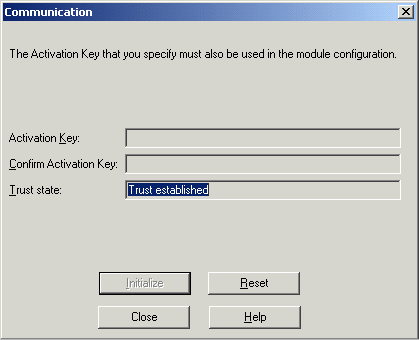
Click Communication.
|
|
4.
|
Verify that the Trust state field shows Trust established.
|
|
5.
|
|
7.
|
Select Policy > Install to install the policy on the firewall. See Check Point product documentation for more information.
|
|
9.
|
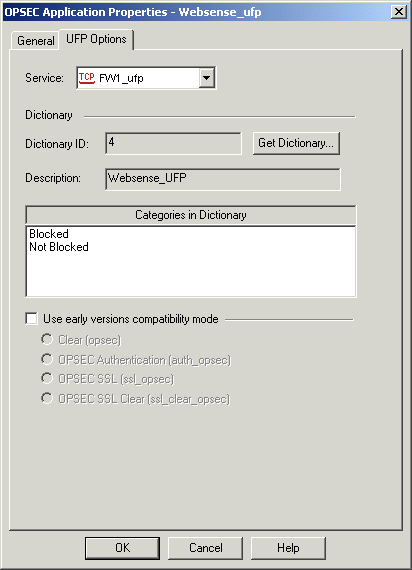
Go to the UFP Options tab of the OPSEC Application Properties dialog box for this object.
|
|
10.
|
Make sure the Use early versions compatibility mode check box is not selected. (This field was called Use backwards compatibility mode in earlier versions.)
|
|
11.
|
Click Get Dictionary.
|
|
12.
|
Click OK.
|
|
14.
|
Select Policy > Install to install the policy on the firewall. See Check Point product documentation for additional information.
|
|
2.
|
Open the ufp.conf file in any text editor.
|
|
|
Windows: Use the Windows Services dialog box.
|
|
|
Linux: Use the ./WebsenseAdmin restart command.
|
|
6.
|
Open the SmartDashboard, and select Manage > Servers and OPSEC Applications.
|
|
8.
|
Click Communication.
|
|
9.
|
Click Reset to revoke the SIC certificate and stop SIC.
|
|
10.
|
Click Yes to continue.
|
|
11.
|
Click Close to return to the OPSEC Application Properties dialog box.
|
|
12.
|
Go to the UFP Options tab.
|
|
13.
|
Check the Use early versions compatibility mode option (Backwards Compatibility in earlier versions of FireWall-1 NG).
|
|
14.
|
Select Clear (opsec).
|
|
15.
|
Click Get Dictionary.
|
|
16.
|
Click OK.
|
|
18.
|
Select Policy > Install to install the policy on the firewall. See Check Point product documentation for more information.
|
|
|
|
|
Integrating Web Security with Check Point > Configuring CheckPoint secure communication
|