Deployment and Installation Center
Websense TRITON Enterprise v7.6.x
Deployment and Installation Center

|

|

|

|
Choosing and Deploying Data Security Agents > Printer agent
|
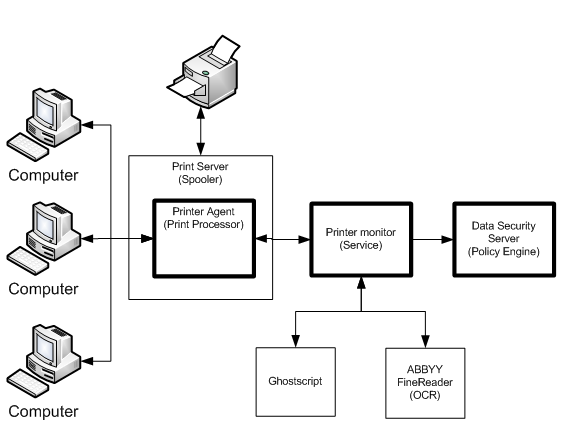
The Data Security printer agent is required when you want to monitor what is printed on your organization's network printers.When a user on the network prints a file, it is routed to the Microsoft Windows printer spooler service, where the printer agent intercepts it and sends it to the Data Security policy engine. After analysis of the content, the Data Security system enforces the policy as necessary: either auditing, monitoring or blocking the print job from being printed, in which case the sender (the user who printed the document) receives a notification that the print job was blocked.The printer agent is capable of identifying the user that submitted the print job, because these credentials are included in the print job.Websense Data Security generates forensics reports that list the blocked print files along with other blocked transmissions.You install the printer agent on a Windows print server. It includes optical character recognition (OCR) capabilities. The OCR service (ABBYY FineReader) is required in printer agent installations for better analysis in different printer drivers. Installation without the OCR service is limited and should be performed only after receiving verification from Websense Technical Support that your organization's specific printer driver is supported.The OCR service enables the recognition and prevention of "corporate-defined" confidential content being printed. The OCR service is required not only to support certain sources, but is also a must when certain printer drivers are used, for example, PCL 6. As a general rule, only standard formats, such as extended meta file (EMF), printer control language (PCL), text (TXT), and postscript (PS) can be received by the printer agent. Nonstandard formats are not supported.The printer agent is installed using a separate printer agent package (WebsenseDataSecurityPrinterAgent.zip) See Installing the printer agent for instructions.If these 2 conditions are not met, the installer doesn't show the option to install the printer agent.
|
|
|
|
|
Choosing and Deploying Data Security Agents > Printer agent
|