The protector is an essential component of Websense Data Security, providing monitoring and blocking capabilities, preventing data loss and leaks of sensitive information. Using PreciseID technology, the protector can be configured to accurately monitor sensitive information-in-transit on any port.
The protector works in tandem with the Data Security server. The Data Security server provides advanced analysis capabilities, while the protector sits on the network, intercepts traffic and can either monitor or block the traffic, as needed. The protector supports analysis of SMTP, HTTP, FTP, plain text, IM traffic (e.g., Yahoo, MSN, chat, and file transfer). The protector is also an integration point for third-party solutions that support ICAP.
We do not recommend that you use both options for the same traffic, although some companies prefer monitoring one point and enforcing policies on another, due to differences in network traffic content and load.
If you want to monitor or transparently block HTTP traffic, you can use the protector to do so, or you can integrate Data Security with Websense Content Gateway or another Web proxy.
If you want to monitor FTP, plain text, or IM traffic, you should use the protector. Note that the protector cannot block traffic on these channels. You can block FTP using Websense Content Gateway (as a DLP agent) or other Web proxy that buffers FTP and supports ICAP.
Most data-loss detection devices can be connected off the network, enabling them to sniff network traffic and monitor breaches. This monitoring method is useful because it does not interfere with traffic; however, it also does not enable the loss-prevention system to prevent (block) data losses—only to note and report them. In addition to monitoring mode, you can connect the Websense Protector to the network directly in the path of the traffic, enabling traffic to be blocked, quarantined and even terminated before it reaches its destination.
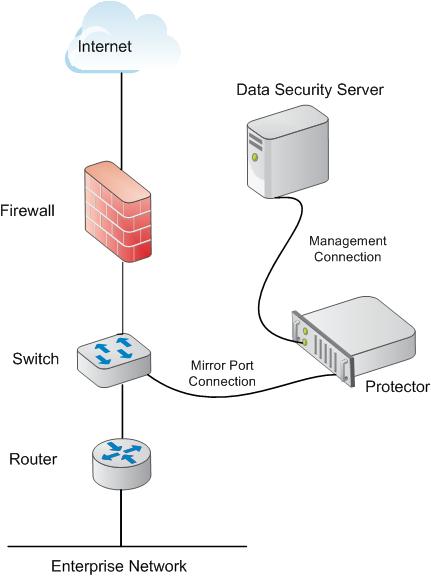
In SPAN/mirror port mode, the protector is connected off the network via the SPAN/mirror port of a switch, which enables the protector to sniff traffic and receive a copy for monitoring purposes, or via a SPAN/mirror device. In SPAN/mirror port mode, traffic is monitored and analyzed, but cannot be blocked. Note that the protector can also be connected to a TAP device.
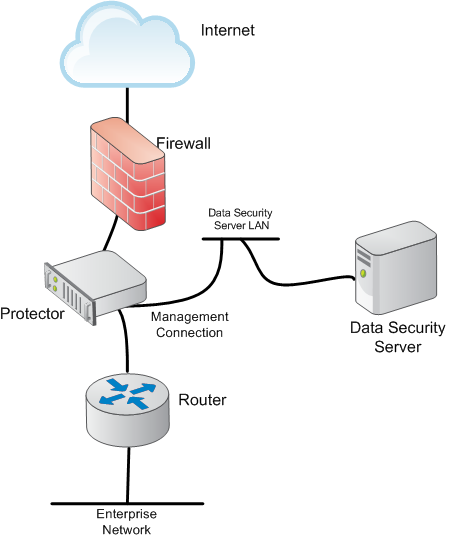
In inline/bridge mode, configure the protector as a layer-2 switch directly in the path of your organization's traffic. In this configuration, the data security device functions passively, monitoring the traffic (as in monitoring mode), or actively, blocking traffic as necessary.
When using the Websense Protector in inline mode, the hardware and software failsafe mechanism is available only when using the certified bypass-server adapter NIC.
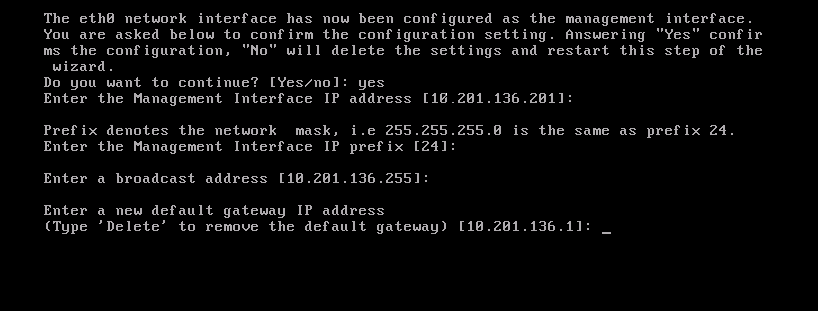
If you are planning to use one of these modes, when executing the Data Security Protector wizard, make sure the time, date and time zone are precise, and map eth0 to verify it is located on the main board. Connect eth0 of the protector to the LAN.
In inline network configuration, the protector can monitor or block traffic. Monitoring bridge mode monitors traffic. SMTP MTA and HTTP Active Bridge modes have both monitoring and blocking options.
In inline monitoring mode, the protector actually sits in the data path on the network—however, data is monitored and not blocked. This mode is particularly useful during the setup phase, when testing the protector to make sure configuration is accurate and network-appropriate, before enabling blocking capabilities on the network.
In inline blocking mode (also known as active bridge mode), the protector sits in the data path on the network. All traffic that traverses the protector is analyzed either locally by the policy engine resident on the protector, or by a Data Security server if load balancing is set up.
The policy engine applies all policies as necessary before determining whether traffic is forwarded to its original destination. If data is detected that is supposed to be blocked, it is quarantined by the protector and does not reach its destinations. All traffic that does not match a policy and is not considered suspicious by the policy engine is forwarded by the protector to its original destination.
In some cases, incoming traffic from the Internet and outgoing traffic to the Internet are on separate links. In this case, the mirror port must be configured to send traffic from both links to the protector. The protector needs to have access to the Data Security Management Server and vice versa.
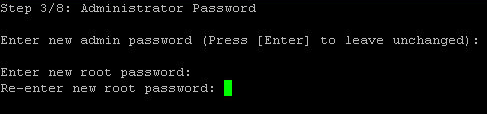
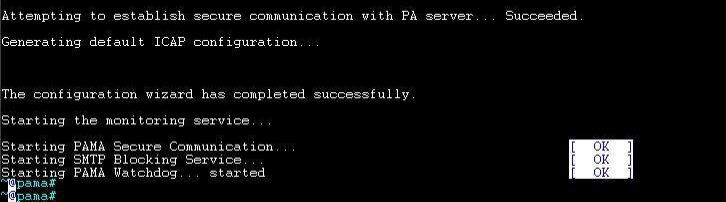
When the protector CLI opens for the first time, logging in as admin automatically opens the installation wizard. On subsequent attempts, type "wizard" at the command prompt to access the wizard.
When the wizard requires data entry, it prompts you. In some cases, a default setting is provided (shown within brackets [ ]). If the default setting is acceptable, press
<Enter> to keep the default value.
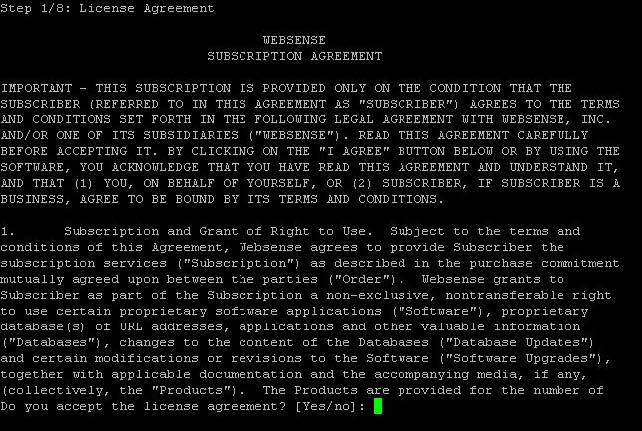
Each time the installation wizard opens, the end-user license agreement appears. Use the page-down/ scroll /space keys to read/scroll to the end of the agreement. Carefully read the license agreement, and when prompted, type
yes to accept the license agreement.
A list of available network interfaces (NICs) appears. In this step, choose the NIC for use by the Data Security Management Server, SSH connections, and logging onto the protector (eth0 by default). All other NICs will be used for intercepting traffic.
To help you identify which NIC to use, the wizard can simulate traffic for 0-60 seconds and cause LEDs to blink on that port. This does not work for all hardware and drivers.
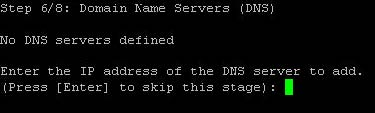
Optionally, type the IP address of the domain name server (DNS) that will service this protector. A DNS will allow access to other network resources using their names instead of their IP addresses.
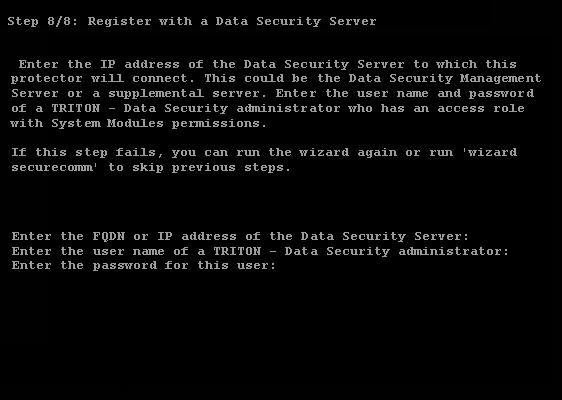
In this step, a secure channel will be created connecting the protector to a Data Security Server. This can be the Data Security Management Server or a supplemental server, depending on your set up.
In the Data Security module of TRITON Unified Security Center, verify that the Websense Protector is no longer pending and that the icon displays its active status. Refresh the browser.
To begin monitoring the network for sensitive information loss, you must perform some configuration in the TRITON - Data Security user interface. See the TRITON Unified Security Center Help system for instructions on logging on.
Once logged on, navigate to Settings > Deployment > System Modules and double-click the installed protector.
When you are done, make sure the protector does not have the status Disabled or
Pending. You can view its status by looking at the System Modules page.
Bypass can be used in the event that the Bypass Server Adapter NIC was ordered with the protector; it enables transparent failover in the event of protector failure. When Bypass is enabled, if the protector malfunctions or is powered off, traffic will transparently pass through the protector to the external network. (Bypass mode is relevant only to the inline/bridge network topology.)
When a certified Bypass Server Adapter NIC dual or quad network card is available on the protector, it's possible to enable the protector's bypass mode. Bypass is a failsafe mechanism that shorts the protector in the unlikely event of device failure, enabling all network traffic to pass transparently through the protector to the network.
You configure bypass mode in the TRITON - Data Security user interface. Select Settings >
Configuration >
System Modules. Select the protector, then navigate to the Networking tab and select
Enable bypass mode. Refer to the TRITON - Data Security Help system
for more details
.
By default, Bypass Mode is enabled. This means that when either a software or hardware problem occurs that causes the protector to malfunction, the protector will automatically be bypassed and the (unanalyzed) traffic will continue to pass to the outside network. If Bypass is disabled, when a malfunction occurs
all traffic will be blocked and won't reach its intended destination.
|
2.
|
Select Settings > Deployment > System Modules.
|
If you are experiencing network problems, you can verify that problems are not within the Data Security software, by setting Manual Bypass to On and noting if problems persist.
 Deployment and Installation Center