Deployment and Installation Center
Websense TRITON Enterprise v7.6.x


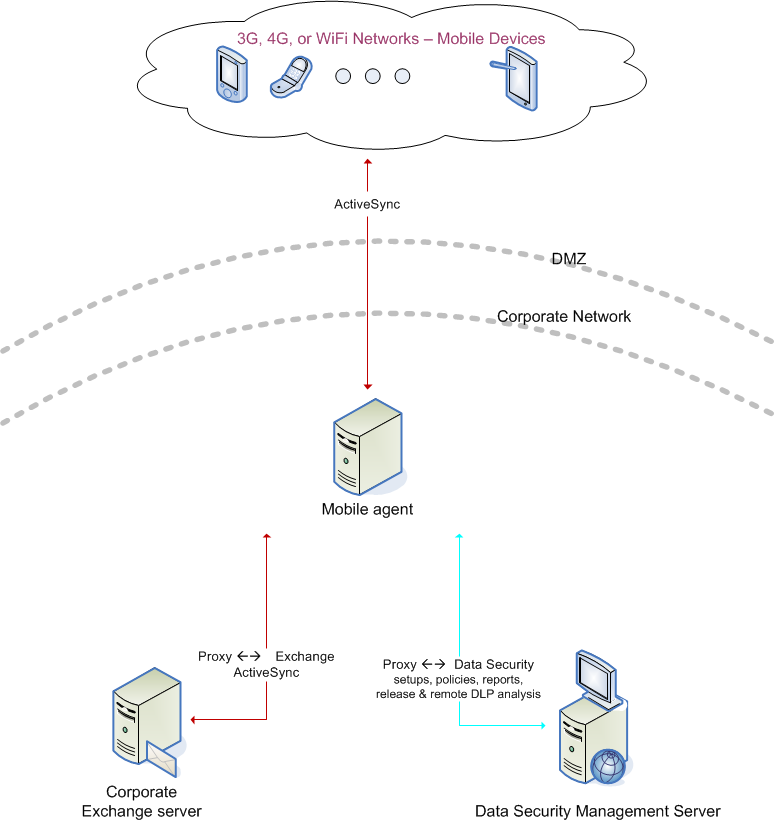
The mobile agent is a Linux-based appliance that lets you secure the type of email content that is synchronized to users' mobile devices when they connect to the network. This includes content in email messages, calendar events, and tasks.
The mobile agent analyzes content when users synchronize their mobile devices to your organization's Exchange server. If content or data being pushed to their device breaches the organization's mobile DLP policy, it is quarantined or permitted accordingly.
In your network, the appliance connects to the Data Security Management Server and to your Microsoft Exchange agent to provide this function. DLP analysis is done on the appliance or on other Data Security servers (rather than on the management server) to optimize performance and balance the load.
Outside your DMZ, the mobile agent connects to any Microsoft ActiveSync-compatible mobile device over 3G and wireless networks, such as i-pads, Android mobile phones, and i-phones. (ActiveSync is a wireless communication protocol used to push resources, such as email, from applications to mobile devices.)
Unlike the protector, the mobile agent appliance acts as a reverse proxy, because it retrieves resources, such as email, from the Exchange server on behalf of the mobile device.
The following diagram illustrates the system architecture of a typical mobile agent deployment. Depending on your network and security requirements, you can also go through an edge device, such as a Microsoft ISA Server, that acts as a reverse proxy to the mobile agent.
For the default port numbers used by the mobile agent, see Default ports. If you have a security policy in place, exclude these ports from that policy so the mobile agent can operate properly. You can lock down or harden your security systems once these ports are open.
The mobile agent must be installed on hardware that meets the requirements described in Mobile Agent hardware requirements. Websense appliances meet these requirements, or you can host the agent on your own Linux-based hardware.
Note 
For best performance, make sure that the mobile agent is located in close proximity to the back-end server.
1.
If you have purchased the Websense V5000 G2 Data Security Appliance (v7.6.3 and later), follow the instructions on its quick start poster to rack, cable, and power on the appliance.
a.
Use either a direct terminal or connect via serial port to access the command line. For serial port connection, configure your terminal application, such as HyperTerminal or TeraTerm, as follows:
b.
The mobile agent software is provided on an ISO image. Download the image, WebsenseDataSecurityProtector76x.iso, from MyWebsense and burn it to a CD.
d.
An installer page appears. If you are using a regular keyboard and screen, type kvm and press Enter. If you are using a serial console, press Enter. The machine is automatically restarted.
2.
You're prompted to enter a user name and password. Enter root for user name and admin for password.
*
Capital letter: Shows the default value, such as Yes/no for a yes/No prompt.
*
Square brackets ([ ]): Shows the current value and is usually followed by text, such as: Press [Enter] to leave as is.
If the default setting is acceptable, press <Enter> to keep the default value.
Each time the installation wizard opens, the end-user license agreement appears. Use the page-down/ scroll / space keys to read/scroll to the end of the agreement.
Important 
A valid password should be at least 7 characters in length. It should contain at least 2 of the following classes:
If you begin the password with a capital letter or end it with a digit, these characters do not count as one of these classes.
Important 
A valid password should be at least 7 characters in length. It should contain at least 2 of the following classes:
If you begin the password with a capital letter or end it with a digit, these characters do not count as one of these classes.
1.
a.
Type e to configure the NIC that you selected. You are prompted to define details for the NIC, such as IP address, network address, and gateway (only for the first NIC that you define). You do not need to specify the gateway for subsequent NICs that you want to define.
b.
Type a to change the current NIC alias address setup.
c.
Type b for LEDs to blink on that port.
d.
Type Enter to exit and continue setting other NICs, if required.
b.
Type the network prefix. This is the subnet mask in abbreviated format (number of bits in the subnet mask). The default is 255.255.255.0 for eth0.
c.
Type the IP address for the default gateway to be used to access the network. This configuration is only for the first NIC that you configured.
d.
After you have configured your NIC, you can redefine it (change the IP address, network prefix, or gateway) or remove it (type e, then d) if necessary.
Note 
If you type Enter, a list of available NICs display, allowing you to define other NICs.
e.
Type a NIC index number to configure another NIC (or reconfigure the same NIC), or type Enter to finish setting up the NICs and continue to the routing setup.
*
Enter: Accept the routing configuration.
*
Index: Modify or delete a routing entry index.
*
a: Add a routing entry.
Note 
If the IP address of the Data Security server is not on the same subnet as the one specified for the mobile management NIC, a gateway is required to tell the mobile agent how to communicate with the Data Security server.
Note 
After you finish routing the configuration, you are prompted to store the network configuration.
*
If you type n, the network configuration is not saved, and you are prompted to configure the network again.
*
If you type y, the details for the network configuration are saved and the network service is reloaded with the new parameters. The new parameters, such as IP address, network prefix, and gateway for the NIC display on the wizard.
5.
Type the index number of the Management NIC you have chosen, or type c to define the network parameters. This NIC can be used for other purposes, such as SSH connections, access points for mobile devices, and Exchange communications.
This can be used to secure the connections between mobile devices and the mobile agent using the default certificate. The default certificate is a self-signed certificate automatically generated by Websense.
Optionally, in the wizard, type the IP address of the Domain Name Server (DNS) that will service this mobile agent. A DNS will allow access to other network resources using their names instead of their IP addresses.
Important 
Type the IP address of the DNS server if you identify the back-end Exchange server by its host name (using the Data Security GUI) instead of by its IP address.
In this step, a secure channel will be created connecting the mobile agent to a Data Security Server. This can be the Data Security Management Server or a supplemental server, depending on your set up.
1.
Type the IP address or FQDN of the Data Security Server. Note that this must be the IP address identified when you installed the server machine. It cannot be a secondary IP address.
2.
3.
Type Enter to exit the wizard. A message displays stating that the configuration was successful.
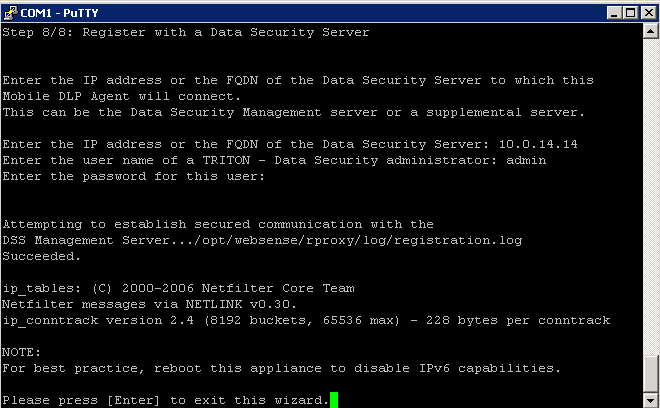
For best practice, reboot the mobile agent appliance. You can reboot later if desired. This completes the IPv6 disabling process that the wizard starts.
In the Data Security module of TRITON Unified Security Center, verify that the Websense mobile agent is no longer pending and that the icon displays its active status. Refresh the browser.
Click Deploy.
Note 
If you reboot, make sure that the mobile agent appliance is on before you configure the mobile agent.
2.
Navigate to Settings > Deployment > System Modules.
4.
Double-click Mobile agent.
5.
Click the Connection tab, then define the connections: Exchange and Mobile Devices. For more information, see the TRITON - Data Security Help.
a.
For Exchange Connection, supply the domain and name or IP address of the Exchange server. Ensure a port number is specified.
*
If you select the Use secure connection (SSL) check box, the port number defaults to 443.
*
If you do not select the Use secure connection (SSL) check box, the port number defaults to 80.
Important 
If the Exchange server is specified by name, make sure local resolving is properly configured to resolve this name. In addition, if an edge-like device is used (for example, ISA), ensure there are no loops through the device.
b.
For Mobile Devices Connection, supply the following information: IP address of the mobile agent and port number. To use all IP addresses, select All IP addresses from the IP address drop-down list.
Note 
The IP address of the mobile agent was defined during the installation of the mobile device, when configuring the network settings.
6.
*
Self-signed certificate (default option)
a.
Click Browse to locate and upload your public certificate.
b.
Click Browse to locate and upload your private key.
c.
Optionally, select the Add chained certificate check box, and click Browse to locate and upload your chained certificate.
7.
Click the Analysis tab and then select a mode: Blocking or Monitoring. Click the Analysis tab, then configure the Mode.
Note 
*
Select the Allow on fail option (the default option is Block on fail). Selecting Allow on fail enables failed messages to be received on the mobile device. If you do not select Allow on fail, these messages will be dropped and are not tracked nor released.
*
Define the sender's email address, outgoing mail server, and port to Notify Users of Breach. To do so, navigate to Settings > System > Alerts > Email Properties.
8.
Navigate to Main > Resources > Notifications and select the mobile policy violation template. Add sender details, then use the Outgoing mail server field to define a next hop relay for outbound mail. If you do not, the mobile agent may not send block notifications.
9.
Click Deploy.
Tip 
You can also configure the mobile agent for high-availability. High-availability enables mobile devices to run seamlessly and continuously in the event of a system outage (such as hardware or software failure).
To begin analysis, configure the mobile DLP policy or create a custom policy. To configure the mobile DLP policy, Navigate to Main > DLP Policies > Mobile DLP Policy. See TRITON - Data Security Help for more configuration information.
To create a custom policy, navigate to Main > DLP Policies > Manage Policies. Select Mobile Email on the Destination tab for each rule to support Mobile events.