
|

|

|

|
|
1.
|
Enter a Name for this notification template, such as "Breach notification".
|
|
2.
|
Enter a Description for the template.
|
|
1.
|
Enter the Sender name that appears in the email From field when notifications are sent. The maximum length is 1024 characters.
|
|
2.
|
Enter the Sender email address: the email address of the person from whom notifications should be sent. The maximum length is 1024 characters.
|
|
3.
|
|
4.
|
Enter a Subject for the notification. This appears in the email Subject: line. The maximum length is 4000 characters.
|
|
5.
|
Define one or more Recipients for the notification.
|
|
|
Click Edit to select to select business units or directory entries.
|
|
|
Select Additional email addresses, then click the right arrow to select a dynamic recipient that varies according to the incident. For example, you can choose to send the notification to the policy owners, administrators, source, or source's manager. Select the variable that applies, such as %Policy Owners%. Separate multiple addresses with commas.
|
|
1.
|
Select a notification Type:
|
|
|
Select Standard to include all of the elements shown in the Body Content box. You can enable or disable these elements if you use the standard notification type.
|
|
|
Select Custom to send a custom notification. Edit the default text as needed. The drop-down menu provides variables.
|
|
2.
|
Select a display format from the Display as drop-down list: HTML or plain text.
|
|
|
Select Logo to display the Forcepoint logo, date, and time.
|
|
|
Select Action to displays the action taken when the breach was discovered.
|
|
|
Select Message to user, then update the text as needed. The result is displayed in the email body. Click the right-arrow icon to see a list of variables that may be included in the message.
|
|
|
Select Incident details to include incident details in the notification message.
|
|
|
Select Violation triggers to attach a list of rules violated by the breach.
|
|
|
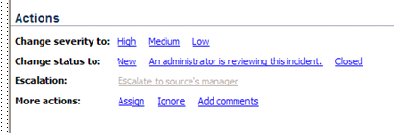
Select Include links so that recipients can perform operations on the incident to include links that administrators can use to perform workflow operations on the incident (like assign, ignore, and escalate) directly from the notification. (See sample links below.)
|
|
|
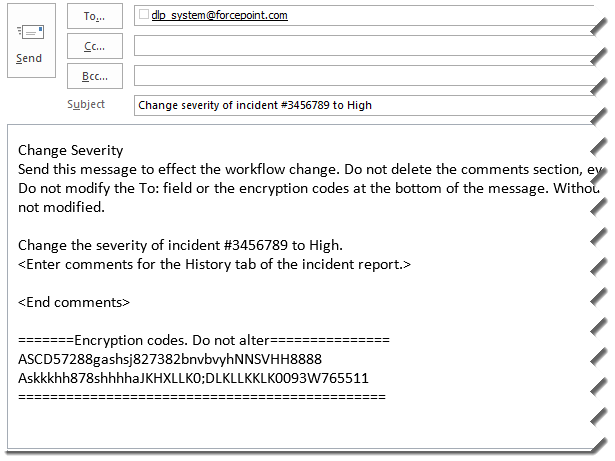
Select Allow recipients to release quarantined email from this notification to give message recipients the ability to release blocked messages by replying to their notification message or by clicking the Release All link within the message.
|
|
To include links in notifications or to allow recipients to release messages, you must configure the incoming mail server to use to receive these requests. To do so, click Mail Server Settings on the toolbar. See Mail servers for more information.
|
|
4.
|
Select Attach policy-breach content to include the content that violated policy as an attachment to the message.
|
|
5.
|
Click OK to save your changes.
|
|
|
|
|
|